Self-healing distributed Pytorch training with Slurm on Crusoe Managed Kubernetes
This guide walks through deploying a self-healing distributed PyTorch training workflow on Crusoe Managed Kubernetes, combining AutoClusters and Command Center to automatically detect failures, replace nodes, and resume training from checkpoints in under 15 minutes.


Training large-scale AI models demands infrastructure that can keep pace with the relentless pressure of modern workloads, where a single node failure can mean hours of lost progress and wasted compute. The complexity of high-density GPU clusters introduces significant operational risk: hardware faults are inevitable, and without automated recovery, distributed training jobs stall, checkpoints go unused, and engineering teams are left scrambling to manually intervene.
Crusoe Cloud eliminates this operational burden with a unified platform that detects failures, replaces nodes, and resumes training automatically, all without human intervention. In this step-by-step guide, we'll walk you through deploying a self-healing PyTorch training workflow that turns hardware failure from a crisis into a non-event.
What you’ll build
We will provision a Crusoe Managed Kubernetes (CMK) cluster, configure a Slurm environment on B200 GPUs, and run a distributed PyTorch training job that automatically resumes from checkpoints. This demo runs on CMK, with Slurm deployed on top via the Crusoe Slurm operator to handle job scheduling and orchestration across GPU worker nodes. AutoClusters monitors the cluster for hardware faults and automatically remediates failed nodes, while Command Center provides real-time visibility into the entire process.
Crusoe Command Center serves as the main visual for this demo, providing real-time visibility into cluster topology, GPU metrics, and notifications. When a hardware fault is detected, AutoClusters instantly triggers notifications and displays automated remediation details. The system then replaces the failed node without user interaction, enabling Slurm to requeue the job and resume training seamlessly from the last checkpoint.
Upon successful completion of this guide, you will have provisioned and configured a fully operational distributed computing cluster on Crusoe Cloud. This cluster is specifically designed to function as a robust environment for executing machine learning training jobs that can survive a node failure and automatically resume in less than 15 minutes.
This guide prioritizes the underlying infrastructure components and architectural theory of distributed systems, providing a hardware-agnostic framework that remains applicable across varying GPU architectures and machine learning workloads.
Step 1: Prerequisites
Before you begin, ensure you have:
- Access to the Crusoe CLI
- Appropriate permissions to create CMK clusters
- Your role should be org-editor, project-editor, or org-admin
- Roles can be viewed by running
crusoe projects list - See Managing users for more details
- Capacity to launch 2 GPU worker nodes in the same region
- This example uses 2 nodes of 8x NVIDIA B200 180GB (b200-180gb-sxm-ib-8x)
Step 2: K8s cluster setup
Follow the Crusoe Managed Slurm on CMK guide to set up your cluster, with one important modification in Step 1:
When creating your Kubernetes cluster in Step 1 of the guide listed above, you must add autoclusters as an add-on.
Your cluster creation command should look like this:
crusoe kubernetes clusters create \
  --name <name> \
  --cluster-version <cluster-version> \
  --location <location> \
  --subnet-id <subnet-id> \
  --add-ons crusoe_csi,nvidia_gpu_operator,nvidia_network_operator,crusoe_managed_slurm,autoclusters
Follow the remaining steps in the original guide to launch your cluster, then return to this guide. Optionally, you can run the NCCL tests on your cluster to verify your GPUs are communicating correctly and performing as expected.
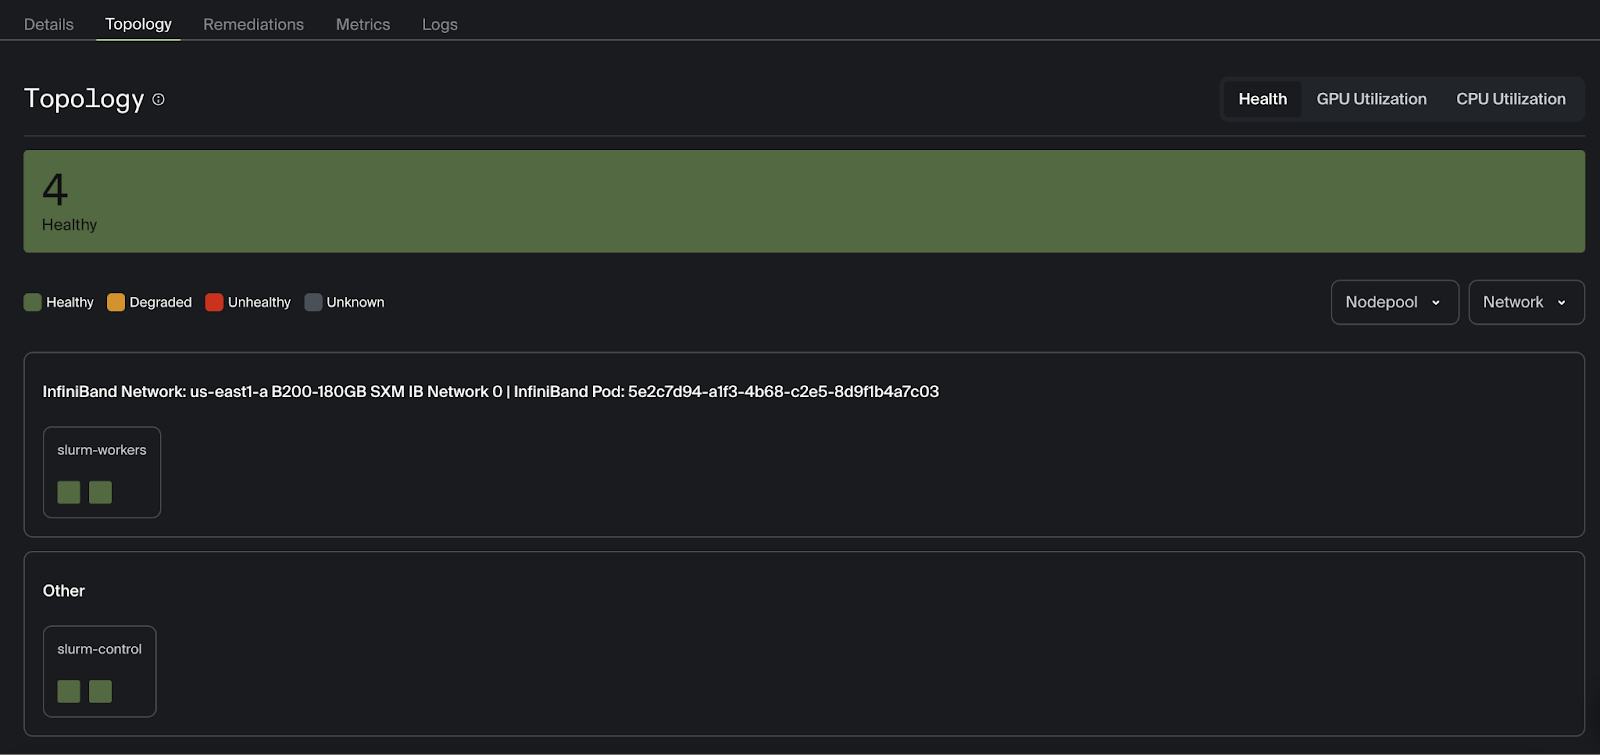
You should now see your healthy worker nodes displayed in the Command Center topology view.
Now we can start setting up our AI workload.
Step 3: Defining the Slurm launch script
First, SSH into your cluster login node (where the NCCL tests were launched) to create the necessary files. The Slurm batch script, PyTorch training script, virtual environment, and logs will live on the cluster login node.
The following Slurm batch script launches a multi-node distributed training on Crusoe Cloud. By using torchrun with a dynamic rendezvous backend, the script provides a fault-tolerant execution model that automatically coordinates the distributed process group across your allocated nodes.
#!/bin/bash

#SBATCH --job-name=pytorch_training_job
#SBATCH --nodes=2
#SBATCH --ntasks-per-node=1
#SBATCH --gres=gpu:8
#SBATCH --output=%x_%j.out
#SBATCH --exclusive
#SBATCH --requeue=expedited
#SBATCH --open-mode=append

# Use explicit topology map optimized for B200 GPUs
export NCCL_TOPO_FILE=/etc/crusoe/nccl_topo/b200-180gb-sxm-ib-cloud-hypervisor.xml
# Bind NCCL to the primary ethernet interface
export NCCL_SOCKET_IFNAME=eth0
# Assign dedicated InfiniBand lanes per GPU for maximum throughput
export NCCL_IB_HCA="mlx5_1:1,mlx5_2:1,mlx5_3:1,mlx5_4:1,mlx5_5:1,mlx5_6:1,mlx5_7:1,mlx5_8:1"
# Disable VF merging to avoid communication issues in virtualized environments
export NCCL_IB_MERGE_VFS=0
# Suppress verbose NCCL logs; use INFO for debugging
export NCCL_DEBUG=WARN
# Disable HCOLL collective to avoid MPI compatibility issues
export OMPI_MCA_coll_hcoll_enable=0
# Fix PMIx shared memory segment conflict in multi-node jobs
export PMIX_MCA_gds='^ds12'
# Mirror IB device list for UCX transport layer
export UCX_NET_DEVICES="mlx5_1:1,mlx5_2:1,mlx5_3:1,mlx5_4:1,mlx5_5:1,mlx5_6:1,mlx5_7:1,mlx5_8:1"

source /home/training/.venv/bin/activate

export MASTER_ADDR=$(scontrol show hostnames $SLURM_JOB_NODELIST | head -n 1)
export MASTER_PORT=29400

srun torchrun \
    --nnodes=2 \
    --nproc_per_node=8 \
    --rdzv_id=$SLURM_JOB_ID \
    --rdzv_backend=c10d \
    --rdzv_endpoint=$MASTER_ADDR:$MASTER_PORT \
    train.py
Understanding the Slurm batch script
The #SBATCH directives at the top tell the Slurm controller exactly what hardware to reserve before any code runs. In this case, we are requesting a total of 16 GPUs split across two nodes. If a node fails, Slurm will put the job back in the front of the line to restart immediately. --open-mode=append ensures that if the job is requeued, the log file isn't wiped; it just keeps writing where it left off.
The environment variables configure NCCL to use an explicit topology map, dedicated per-GPU InfiniBand lanes, and targeted compatibility fixes, ensuring optimal, stable communication across GPUs.
Finally, the script uses srun to launch torchrun across both nodes, spawning one process per GPU (16 total), with the Slurm job ID and master node endpoint ensuring workers coordinate with each other and not with any other concurrent jobs on the cluster.
Step 4: Writing the training script
Now we will create the PyTorch training script, emphasizing what is unique to training on multi-GPU clusters. This assumes a basic familiarity with deep learning and computer vision. Start by creating a virtual environment and installing dependencies on the shared drive of the login node.
python3 -m venv .venv --without-pip
source .venv/bin/activate
curl https://bootstrap.pypa.io/get-pip.py -o get-pip.py
python get-pip.py

pip install torch torchvision
This environment will be activated when launching the training. The only dependencies in this example are torch and torchvision, both using GPU acceleration.
import os
import torch
import torch.nn as nn
import torch.optim as optim
import torchvision
import torchvision.transforms as transforms
from torch.optim.lr_scheduler import StepLR
from torchvision.models import resnet101, ResNet101_Weights
# Necessary for multi-GPU training with PyTorch
import torch.distributed as dist
from torch.nn.parallel import DistributedDataParallel as DDP
from torch.utils.data import DataLoader, DistributedSampler
Setting up the distributed backend
def setup_distributed():
    dist.init_process_group(backend="nccl", init_method="env://")
    local_rank = int(os.environ["LOCAL_RANK"])
    global_rank = int(os.environ["RANK"])
    torch.cuda.set_device(local_rank)
    return local_rank, global_rank
The setup_distributed function initializes multi-GPU communication by setting up the distributed process group across all GPUs and nodes, using NCCL as the high-speed communication backend and torchrun-set environment variables for automatic process discovery. It returns both the global rank and local rank for use in rank-specific operations later in the script, such as data loading and checkpointing.
Loading and pre-processing data
In a multi-node GPU cluster, data loading must be synchronized to prevent resource contention and ensure that model gradients are computed over a diverse set of samples. The get_dataloader function implements a single-writer, multiple-reader pattern that is standard for large-scale training.
def get_dataloader(local_rank, world_size, batch_size=128):
    transform = transforms.Compose([
        transforms.RandomHorizontalFlip(),
        transforms.ToTensor(),
        transforms.Normalize((0.5,0.5,0.5),(0.5,0.5,0.5))
    ])
    # Rank 0 downloads first
    if local_rank == 0:
        train_dataset = torchvision.datasets.CIFAR10(root="./data", train=True, download=True, transform=transform)
        test_dataset  = torchvision.datasets.CIFAR10(root="./data", train=False, download=True, transform=transform)
    if world_size > 1:
        dist.barrier(device_ids=[local_rank])  # explicitly specify GPU
    # Other ranks load without downloading
    if local_rank != 0:
        train_dataset = torchvision.datasets.CIFAR10(root="./data", train=True, download=False, transform=transform)
        test_dataset  = torchvision.datasets.CIFAR10(root="./data", train=False, download=False, transform=transform)
    train_sampler = DistributedSampler(train_dataset) if world_size>1 else None
    test_sampler  = DistributedSampler(test_dataset, shuffle=False) if world_size>1 else None
    train_loader = DataLoader(train_dataset, batch_size=batch_size, sampler=train_sampler,
                              shuffle=(train_sampler is None), num_workers=16, pin_memory=True)
    test_loader  = DataLoader(test_dataset, batch_size=batch_size, sampler=test_sampler,
                              shuffle=False, num_workers=16, pin_memory=True)
    return train_loader, test_loader, train_sampler
We force Local Rank 0 (the master process on each node) to handle the initial data download. All other processes are held at dist.barrier until the download is complete. Without this synchronization, multiple processes would attempt to write to the same file location simultaneously, leading to filesystem corruption or EOF errors.
The DistributedSampler partitions the dataset into N non-overlapping subsets, where N is the total number of GPUs in the cluster. This ensures that in every training step, each GPU processes a unique batch of data.
Our evaluate function and training loop both follow standard patterns. During each epoch, we run a forward pass, calculate the loss, perform backpropagation, and update our weights. We will only print the loss, epoch, and accuracy when the global rank is zero to prevent duplicate logs.
def evaluate(model, loader, device, rank, world_size):
    model.eval()
    correct, total = 0,0
    with torch.no_grad():
        for batch in loader:
            images, labels = batch
            images, labels = images.to(device), labels.to(device)
            preds = model(images).argmax(dim=1)
            correct += (preds==labels).sum().item()
            total += labels.size(0)
    if world_size>1:
        t = torch.tensor([correct,total], device=device)
        dist.all_reduce(t)
        correct, total = t[0].item(), t[1].item()
    if rank==0:
        print(f"Accuracy: {100*correct/total:.2f}%")

def train_one_epoch(model, loader, sampler, optimizer, loss_fn, device, epoch, rank):
    if sampler: sampler.set_epoch(epoch)
    model.train()
    total_loss = 0.0
    for batch in loader:
        images, labels = batch
        images, labels = images.to(device), labels.to(device)
        optimizer.zero_grad()
        predictions = model(images)
        loss = loss_fn(predictions, labels)
        loss.backward()
        optimizer.step()
        total_loss += loss.item()
    if rank==0:
        print(f"[Epoch {epoch}] Loss: {total_loss/len(loader):.4f}")
Orchestrating everything in the main function
Now we put everything together in our main function.
def main():
    local_rank, global_rank = setup_distributed()
    world_size = int(os.environ.get("WORLD_SIZE", 1))
    device = torch.device(f"cuda:{local_rank}")
    train_loader, test_loader, train_sampler = get_dataloader(local_rank, world_size)
    model = resnet101(weights=ResNet101_Weights.DEFAULT)
    model.fc = nn.Linear(model.fc.in_features, 10)
    model = model.to(device)
    if world_size > 1:
        model = DDP(model, device_ids=[local_rank])
    optimizer = optim.Adam(model.parameters(), lr=1e-3)
    scheduler = StepLR(optimizer, step_size=10, gamma=0.5)
    loss_fn = nn.CrossEntropyLoss()
    job_id = os.environ.get("SLURM_JOB_ID")
    run_dir = os.path.join("runs", job_id)
    checkpoint_path = os.path.join(run_dir, "latest_checkpoint.pth")
    if global_rank == 0 and not os.path.exists(run_dir):
        os.makedirs(run_dir, exist_ok=True)
    start_epoch = 0
    if os.path.exists(checkpoint_path):
        if global_rank == 0:
            print(f"Found checkpoint at {checkpoint_path}. Resuming...")
        # Map location to the current local GPU to avoid rank-mismatch
        map_location = {'cuda:%d' % 0: 'cuda:%d' % local_rank}
        checkpoint = torch.load(checkpoint_path, map_location=map_location)
        # Load states
        model.module.load_state_dict(checkpoint['model_state_dict'])
        optimizer.load_state_dict(checkpoint['optimizer_state_dict'])
        scheduler.load_state_dict(checkpoint['scheduler_state_dict'])
        start_epoch = checkpoint['epoch'] + 1
        if global_rank == 0:
            print(f"Resuming from epoch {start_epoch}")
    num_epochs = 100
    for epoch in range(start_epoch, num_epochs):
        train_one_epoch(model, train_loader, train_sampler, optimizer, loss_fn, device, epoch, global_rank)
        evaluate(model, test_loader, device, global_rank, world_size)
        scheduler.step()
        # --- SAVE LOGIC ---
        if global_rank == 0:
            torch.save({
                'epoch': epoch,
                'model_state_dict': model.module.state_dict(),
                'optimizer_state_dict': optimizer.state_dict(),
                'scheduler_state_dict': scheduler.state_dict(),
            }, checkpoint_path)

    # Clean exit
    if dist.is_initialized():
        dist.barrier()               # wait for all ranks
        dist.destroy_process_group()


if __name__=="__main__":
    main()
The main() function orchestrates the distributed lifecycle: initializing the process group, configuring the hardware-specific model, and implementing the fault-tolerant resume logic required for Slurm auto-requeueing.
We load a pre-trained ResNet-101 model and modify the final fully-connected (fc) layer to match the 10 classes of CIFAR-10 so we can run transfer learning. DDP handles the background gradient synchronization over the InfiniBand fabric, ensuring all GPUs update their weights identically.
Only the Global Rank 0 process is permitted to save checkpoints and create directories. This prevents file locking issues where 16 different processes try to write to the same .pth file simultaneously on a shared filesystem.
Now that we have a Slurm job defined and a PyTorch script to train our model, we can launch the workload across our cluster using the following command from our cluster login node:
sbatch launch_training.batchAfter executing the command above, you should see output that indicates a job has been started with a unique integer identifier. All logs will be printed to the output filepath defined in launch_training.batch. This file will be automatically created, with %x and %j being replaced with the job name and id respectively.
To print the logs in real-time, tail the logs with the following command, replacing %j with the job id, for example:
tail -f pytorch_training_job_45.out[Epoch 0] Loss: 1.1642
Accuracy: 76.12%
[Epoch 1] Loss: 0.4993
Accuracy: 82.26%
[Epoch 2] Loss: 0.3042
Accuracy: 84.88%
[Epoch 3] Loss: 0.2170
Accuracy: 85.62%
[Epoch 4] Loss: 0.1481
Accuracy: 85.59%
[Epoch 5] Loss: 0.1330
Accuracy: 86.65%
[Epoch 6] Loss: 0.1211
Accuracy: 86.49%
[Epoch 7] Loss: 0.1008
Accuracy: 86.66%
[Epoch 8] Loss: 0.0699
Accuracy: 86.54%
[Epoch 9] Loss: 0.0659
Accuracy: 86.77%
[Epoch 10] Loss: 0.0553Now that we have successfully defined the Slurm job and the fault-tolerant PyTorch training script, the self-healing workload is fully configured and the model will be trained as expected. You have a robust, distributed training environment for running training workloads.
The setup of your distributed training cluster is now complete! The remaining steps in this guide demonstrate AutoClusters' self-healing functionality and Command Center’s handling of these types of errors.
Step 5: Automated node replacement
This is where Command Center's observability features shine. You'll see the node status change, GPU metrics drop, fault notifications arrive, and automated remediation kick off, all without leaving the dashboard.
AutoClusters continuously monitors your cluster nodes for hardware errors. When a critical issue is detected, XID 79 for example, it automatically cordons the failed node and drains its running workloads. It then pulls a healthy replacement from the reserve pool and provisions it into the cluster.
For more detailed information on how AutoClusters works, check out our blog AutoClusters: Automated GPU Failure Remediation for AI Training Clusters.
Monitoring fault detection and recovery in Command Center
The immediate drop in GPU utilization, visible in the Metrics tab in Command Center, indicates that training has stopped.

The Command Center will display notifications and an email will be sent to the user, indicating that an error has occurred and remediation is underway.

Automatic node remediation will start immediately to replace the unhealthy node. During remediation, the health of the slurm-workers node pool will update to display the status of node replacement.
The status of the remediation can be viewed on the Remediations tab.

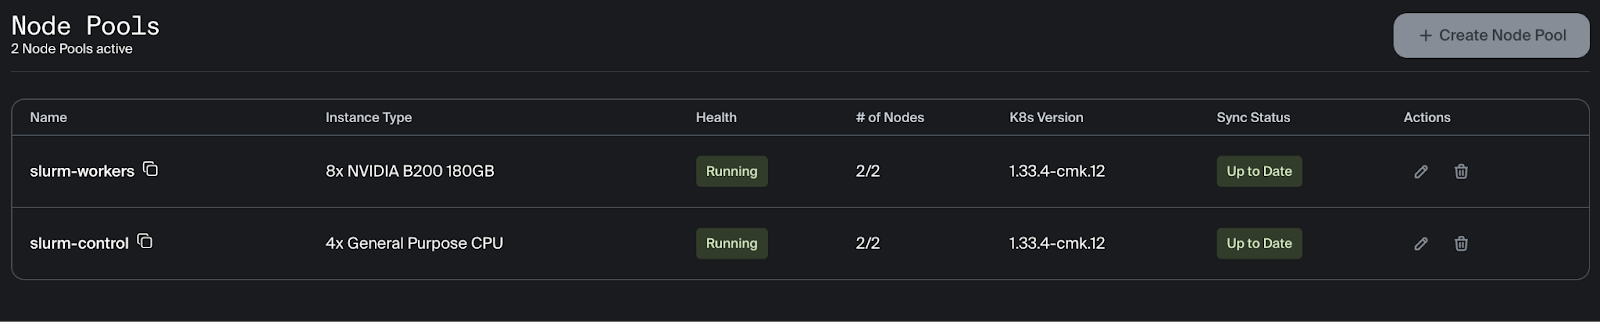
The number of healthy nodes can be viewed in the node pool section after clicking on the cluster.
The training stopped after finishing epoch 50 and correctly resumed at epoch 51. As you can see, the training picks up right where it left off and the loss continues to steadily decrease.
[Epoch 46] Loss: 0.0005
Accuracy: 88.81%
[Epoch 47] Loss: 0.0002
Accuracy: 88.85%
[Epoch 48] Loss: 0.0003
Accuracy: 88.90%
[Epoch 49] Loss: 0.0023
Accuracy: 88.94%
[Epoch 50] Loss: 0.0010
Accuracy: 89.04%
[2026-02-27T16:42:19] error: *** JOB 45 ON slurm-cluster-x1gzc-slurm-worker-node-set-0 CANCELLED AT 2026-02-27T16:42:19 DUE TO NODE FAILURE, SEE SLURMCTLD LOG FOR DETAILS ***
srun: error: Node failure on slurm-cluster-x1gzc-slurm-worker-node-set-1
W0227 16:42:19.102000 455060 torch/distributed/elastic/agent/server/api.py:739] Received 15 death signal, shutting down workers
srun: Job step aborted: Waiting up to 32 seconds for job step to finish.
W0227 16:42:19.105000 455060 torch/distributed/elastic/multiprocessing/api.py:1010] Sending process 455126 closing signal SIGTERM
W0227 16:42:19.108000 455060 torch/distributed/elastic/multiprocessing/api.py:1010] Sending process 455127 closing signal SIGTERM
[2026-02-27T16:42:19] error: *** STEP 45.0 ON slurm-cluster-x1gzc-slurm-worker-node-set-0 CANCELLED AT 2026-02-27T16:42:19 DUE TO NODE FAILURE, SEE SLURMCTLD LOG FOR DETAILS ***
W0227 16:56:01.752000 505860 torch/distributed/run.py:852]
W0227 16:56:01.752000 505860 torch/distributed/run.py:852] *****************************************
W0227 16:56:01.752000 505860 torch/distributed/run.py:852] Setting OMP_NUM_THREADS environment variable for each process to be 1 in default, to avoid your system being overloaded, please further tune the variable for optimal performance in your application as needed.
W0227 16:56:01.752000 505860 torch/distributed/run.py:852] *****************************************
W0227 16:56:09.597000 136 torch/distributed/run.py:852]
W0227 16:56:09.597000 136 torch/distributed/run.py:852] *****************************************
W0227 16:56:09.597000 136 torch/distributed/run.py:852] Setting OMP_NUM_THREADS environment variable for each process to be 1 in default, to avoid your system being overloaded, please further tune the variable for optimal performance in your application as needed.
W0227 16:56:09.597000 136 torch/distributed/run.py:852] *****************************************
/home/training/.venv/lib/python3.12/site-packages/torchvision/datasets/cifar.py:83: VisibleDeprecationWarning: dtype(): align should be passed as Python or NumPy boolean but got 'align=0'. Did you mean to pass a tuple to create a subarray type? (Deprecated NumPy 2.4)
NCCL version 2.27.5+cuda12.9
  entry = pickle.load(f, encoding="latin1")
/home/training/.venv/lib/python3.12/site-packages/torchvision/datasets/cifar.py:83: VisibleDeprecationWarning: dtype(): align should be passed as Python or NumPy boolean but got 'align=0'. Did you mean to pass a tuple to create a subarray type? (Deprecated NumPy 2.4)
  entry = pickle.load(f, encoding="latin1")
Downloading: "https://download.pytorch.org/models/resnet101-cd907fc2.pth" to /root/.cache/torch/hub/checkpoints/resnet101-cd907fc2.pth
100%|██████████| 171M/171M [00:00<00:00, 347MB/s]
Found checkpoint at runs/45/latest_checkpoint.pth. Resuming...
Resuming from epoch 51
[Epoch 51] Loss: 0.0007
Accuracy: 88.92%
[Epoch 52] Loss: 0.0010
Accuracy: 88.98%
[Epoch 53] Loss: 0.0003
Accuracy: 88.81%
[Epoch 54] Loss: 0.0002
Accuracy: 88.85%
[Epoch 55] Loss: 0.0002
Accuracy: 88.66%
Command Center also shows the GPU utilization return to over 90%.

AutoClusters successfully detected the hardware error, cordoned and drained the failed node, and provisioned a healthy replacement from the reserve pool. The Slurm job was then automatically requeued and the training workload resumed, all in under 15 minutes!
Conclusion
You're now equipped to run fault-tolerant, self-healing distributed training workloads on Crusoe Cloud! By combining Crusoe Managed Kubernetes, the Crusoe Managed Slurm operator, and AutoClusters, you've seen how the platform automatically detects hardware faults, replaces failed nodes, and resumes training from checkpoints, all without manual intervention.
To continue your progress, you can utilize the following resources to further refine your configuration or expand your workloads.
Resources and further reading
- Crusoe Managed Kubernetes
- Crusoe Managed Slurm
- AutoClusters
- Command Center