PyTorch image classification on Crusoe Cloud: A guide to distributed training and inference
Ever wonder how an AI can look at a photo and, almost instantly, tell you if it's a picture of a cat, a dog, or an airplane? It feels like sci-fi magic, but it's actually the result of a powerful technique called image classification. It’s where a trained AI model puts its knowledge to the test, identifying patterns in pixels that we humans recognize as objects.
At its heart, it’s about teaching a machine to see. And today, we’re going to do just that. We're not just running code; we're building an AI's "eyes" from the ground up.
In this guide, we'll walk you through the entire journey, from a blank slate to a working model that can identify images on its own. We’ll cover:
- Training a PyTorch model: Using Torchrun for simple, powerful distributed training across multiple GPUs on Crusoe Cloud.
- Building a simple Convolutional Neural Network (CNN): The "brain" of our vision mode, and understanding how each piece works.
- Explaining the training pipeline: In plain language, so you fully understand what’s happening under the hood.
- Running your model on new images: See your creation in action.
Why build on Crusoe Cloud?
Building ambitious AI requires infrastructure that can keep up. The right platform isn't just a "nice to have,” it's the difference between a breakthrough and a roadblock. Here's why Crusoe Cloud is purpose-built for this kind of work:
- Performance you can count on: Our infrastructure is designed from the ground up for AI workloads. We use high-speed interconnects like NVIDIA NVLink™ so your GPUs can communicate seamlessly, which means faster training times and more efficient model development.
- Scalability on demand: The moment you need more power (whether it's for a bigger model or a larger dataset) we've got you covered. Get rapid access to large clusters of the latest GPUs so your projects never have to wait in line.
- Expert support when you need it: Our team lives and breathes AI infrastructure. When you have a question, you're not talking to a generic help desk; you're talking to engineers who understand the nuances of distributed training and can help you solve complex challenges.
- Pricing that makes sense: We believe in transparent, predictable pricing without the hidden fees that can complicate your budget. This lets you focus your resources on what really matters: building amazing things.
Ready to get started? Let's build.
Step 1: Setting up your workshop
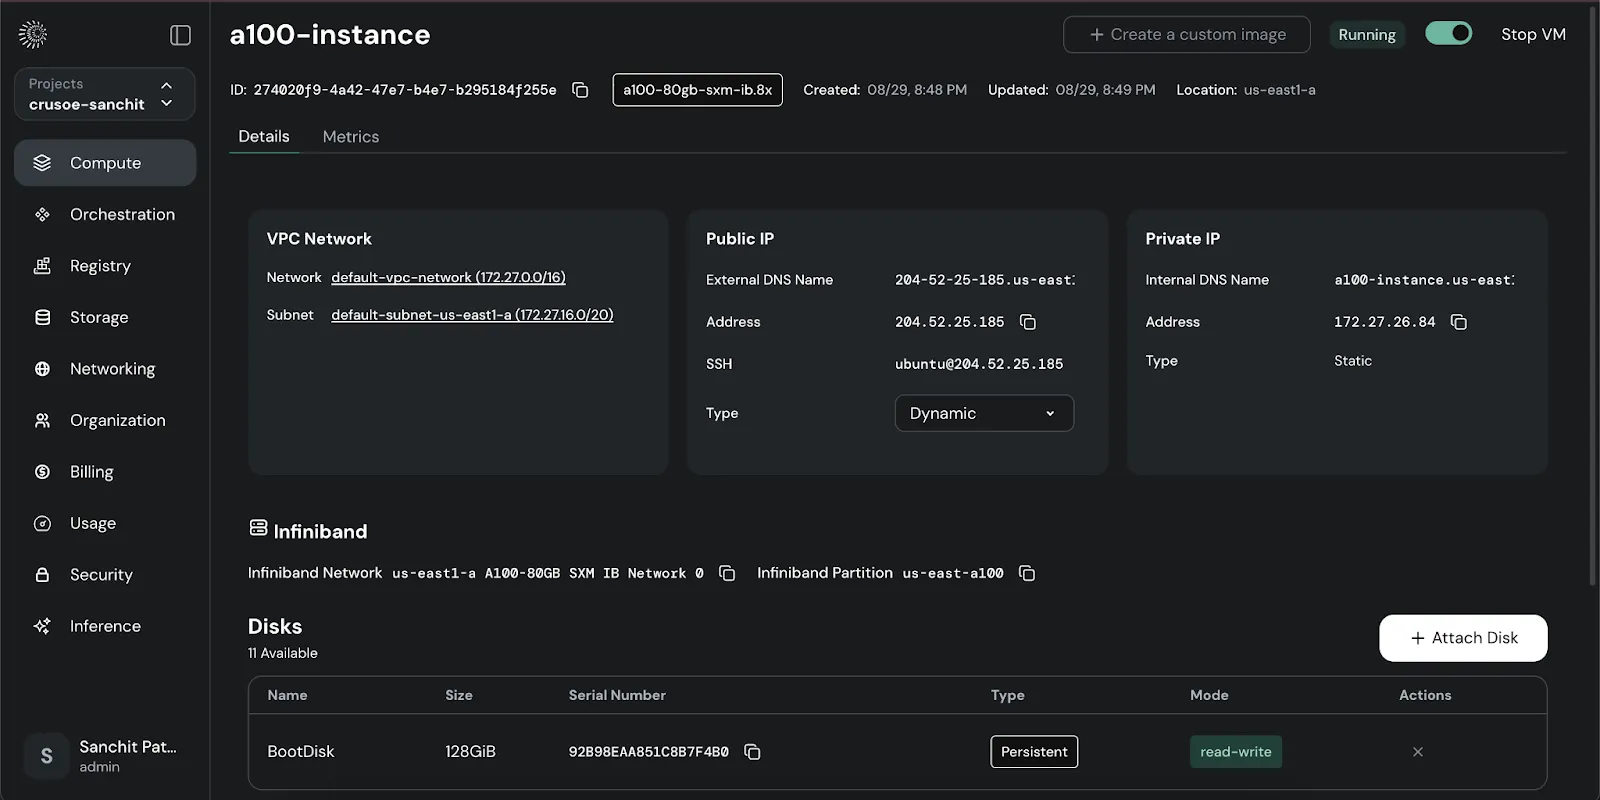
First, we need to spin up a virtual machine on Crusoe Cloud. Head over to the Crusoe Cloud platform to get started. For this tutorial, we’ll use the 8x NVIDIA A100 80GB SXM4 instance, which gives us plenty of power for distributed training.
Once you’re logged into your instance, it's time to install the necessary tools. We'll set up a Python virtual environment to keep our project tidy and then install PyTorch, along with libraries for vision and audio.
Install pre-requisites and dependencies
ubuntu@vaeq-a100:~$ python3 -m venv ~/torch-env
ubuntu@vaeq-a100:~$ source ~/torch-env/bin/activate
(torch-env) ubuntu@vaeq-a100:~$ pip install --upgrade pip
(torch-env) ubuntu@vaeq-a100:~$ pip install torch torchvision torchaudio --index-url https://download.pytorch.org/whl/cu121
Let’s make sure everything is working correctly and that our virtual machine can see all 8 GPUs.
Validate the setup
(torch-env) ubuntu@vaeq-a100:~$ python -c "import torch; print(torch.cuda.is_available()); print(torch.distributed.is_nccl_available())"
True
True

(torch-env) ubuntu@vaeq-a100:~$ python -c "import torch; print('torch:', torch.__version__); print('cuda:', torch.version.cuda); print('device_count:', torch.cuda.device_count())"
torch: 2.5.1+cu121
cuda: 12.1
device_count: 8
Success! We have PyTorch installed, and it recognizes all eight of our A100 GPUs.
What are CUDA and NCCL?
- CUDA is NVIDIA’s toolkit that lets our code tap into the massive parallel processing power of GPUs. Think of it as the bridge between your Python code and the graphics card's hardware.
- NCCL (NVIDIA Collective Communications Library) is a specialized library that helps multiple GPUs talk to each other at incredibly high speeds over optimized paths like NVLink. It's the secret sauce that lets our 8 GPUs work together as one cohesive team.
Step 2: Understanding the building blocks
Before we dive into the code, let's get familiar with the key components of our project.
The dataset: CIFAR-10
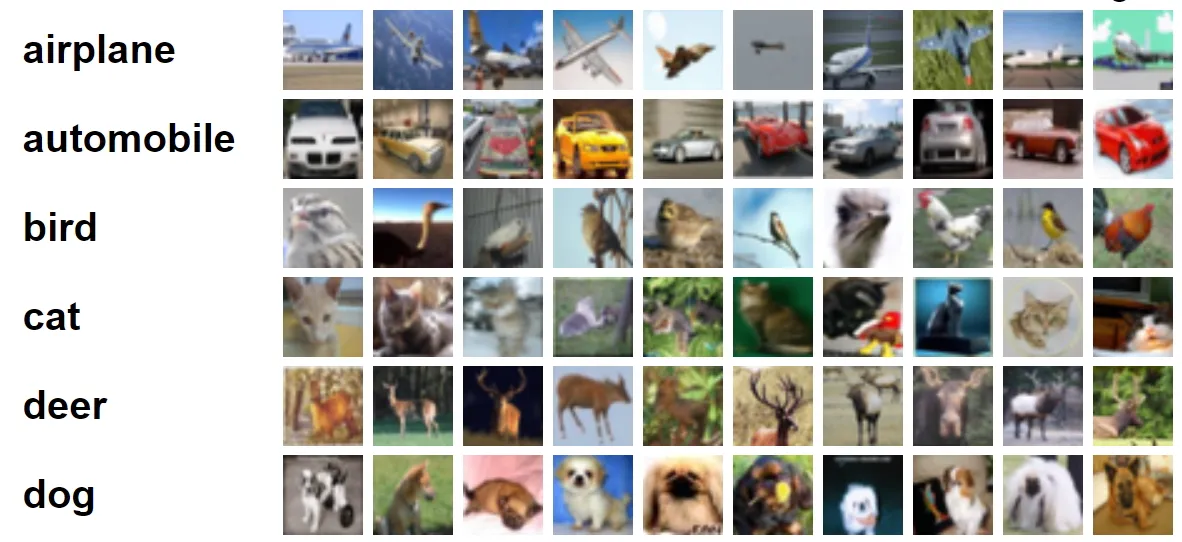
Our model needs data to learn from. We'll use the classic CIFAR-10 dataset, a staple in computer vision research. It consists of 60,000 tiny 32x32 color images, neatly sorted into 10 categories: airplane, car, cat, dog, truck, etc. We'll use 50,000 images for training and 10,000 for testing our model's performance.
The framework: PyTorch
PyTorch is an open-source deep learning library that gives us the tools to build, train, and run neural networks. It’s popular because it feels a lot like writing regular Python, but with supercharged support for GPU acceleration.
The model: The "brain" of the operation
In PyTorch, a model is essentially a function that takes an input (image pixels) and produces an output (a prediction). What makes it special is that it has internal numbers called weights. During training, PyTorch automatically adjusts these weights, making the model better and better at its job. It learns by:
- Making a prediction on an image (it's probably wrong at first).
- Comparing its guess to the correct answer to calculate an error, or loss.
- Adjusting its weights slightly to reduce that error.
- Repeating this process thousands of times until it becomes a pro.
Step 3: Building and training our model
Now for the fun part. Let's write the Python script that defines our model, prepares the data, and handles the training. We'll call it train_cifar.py.
Importing our tools
First, we'll import all the necessary libraries from PyTorch and Torchvision.
import os                                                       # Standard Python library for interacting with the OS (env vars, file paths)
import torch                                                    # Core PyTorch library: provides tensors & GPU acceleration
import torch.nn as nn                                           # Neural network components: layers, loss functions, models
import torch.optim as optim                                     # Optimizers to update model parameters
import torch.distributed as dist                                # PyTorch’s distributed training backend (multi-GPU / multi-node communication)
from torch.nn.parallel import DistributedDataParallel as DDP    # Wrapper to parallelize a model across GPUs/nodes
from torch.utils.data import DataLoader, DistributedSampler     # DataLoader = batches dataset, DistributedSampler = splits data across GPUs
import torchvision                                              # Computer vision utilities: datasets, pretrained models
import torchvision.transforms as transforms                     # Tools to preprocess/augment images
from torch.optim.lr_scheduler import StepLR                     # Learning rate scheduler: decreases LR step-by-step during training
1. Getting your GPUs to talk to each other
This function initializes the process group, allowing all our GPUs to communicate using the high-speed NCCL backend. It assigns each process a unique GPU to ensure they work in parallel without stepping on each other's toes.
def setup_distributed():
    dist.init_process_group(backend="nccl", init_method="env://")
    local_rank = int(os.environ["LOCAL_RANK"])
    torch.cuda.set_device(local_rank)
    return local_rank   # Return GPU index for this process
2. Designing the model: a simple CNN
Here's the architecture of our Convolutional Neural Network (CNN). Think of it as a series of filters that learn to recognize patterns.
- Convolutional Layers (
conv1,conv2): The first layer learns simple features like edges and colors. The second layer combines these into more complex shapes, like an ear or a wheel. - Batch Normalization (
bn1,bn2): This helps stabilize the learning process, preventing the numbers inside the network from becoming too large or small. - Pooling Layer (
pool): This shrinks the image data down while keeping the most important features, making the network more efficient. - Fully Connected Layers (
fc1,fc2): These layers take all the detected features and make the final decision, outputting a score for each of the 10 classes.
class SimpleCNN(nn.Module):
    def __init__(self):
        super().__init__()
        self.conv1 = nn.Conv2d(3, 32, 3, padding=1)
        self.bn1   = nn.BatchNorm2d(32)
        self.conv2 = nn.Conv2d(32, 64, 3, padding=1)
        self.bn2   = nn.BatchNorm2d(64)
        self.pool = nn.MaxPool2d(2,2)
        self.fc1 = nn.Linear(64*8*8, 128)
        self.fc2 = nn.Linear(128, 10)

    def forward(self, x):
        x = torch.relu(self.bn1(self.conv1(x)))
        x = self.pool(x)
        x = torch.relu(self.bn2(self.conv2(x)))
        x = self.pool(x)
        x = x.view(x.size(0), -1)
        x = torch.relu(self.fc1(x))
        return self.fc2(x)
3. Preparing the data
Raw images need to be preprocessed before our model can use them. This function sets up a pipeline to transform the data:
- Data Augmentation: We randomly flip and crop the images. This teaches the model that a cat is still a cat, even if it's facing a different direction or slightly off-center.
- ToTensor & Normalize: We convert the images into PyTorch tensors (grids of numbers) and normalize their pixel values to make training more stable.
- Distributed Sampler: This is key for multi-GPU training. It ensures each GPU gets a unique slice of the dataset, so they aren't all doing the same work.
def get_dataloader(local_rank, world_size, batch_size=128):
    transform = transforms.Compose([
        transforms.RandomHorizontalFlip(),
        transforms.RandomCrop(32, padding=4),
        transforms.ToTensor(),
        transforms.Normalize((0.5,0.5,0.5),(0.5,0.5,0.5))
    ])

    # Rank 0 downloads first
    if local_rank == 0:
        train_dataset = torchvision.datasets.CIFAR10(root="./data", train=True, download=True, transform=transform)
        test_dataset  = torchvision.datasets.CIFAR10(root="./data", train=False, download=True, transform=transform)

    if world_size > 1:
        dist.barrier(device_ids=[local_rank])  # explicitly specify GPU

    # Other ranks load without downloading
    if local_rank != 0:
        train_dataset = torchvision.datasets.CIFAR10(root="./data", train=True, download=False, transform=transform)
        test_dataset  = torchvision.datasets.CIFAR10(root="./data", train=False, download=False, transform=transform)

    train_sampler = DistributedSampler(train_dataset) if world_size>1 else None
    test_sampler  = DistributedSampler(test_dataset, shuffle=False) if world_size>1 else None

    train_loader = DataLoader(train_dataset, batch_size=batch_size, sampler=train_sampler,
                              shuffle=(train_sampler is None), num_workers=2, pin_memory=True)
    test_loader  = DataLoader(test_dataset, batch_size=batch_size, sampler=test_sampler,
                              shuffle=False, num_workers=2, pin_memory=True)
    return train_loader, test_loader, train_sampler
4. The training loop
This function defines what happens during one full pass over the training data (an epoch). For each batch of images, the model performs its guess, calculates the error (loss), and adjusts its weights to get better. Think of it as one study session for the AI.
def train_one_epoch(model, loader, sampler, optimizer, loss_fn, device, epoch, rank):
    if sampler: sampler.set_epoch(epoch)

    model.train()
    total_loss = 0.0

    for batch in loader:
        images, labels = batch
        images, labels = images.to(device), labels.to(device)

        optimizer.zero_grad()
        predictions = model(images)
        loss = loss_fn(predictions, labels)
        loss.backward()
        optimizer.step()

        total_loss += loss.item()

    if rank==0:
        print(f"[Epoch {epoch}] Loss: {total_loss/len(loader):.4f}")
5. The evaluation loop
After each study session, we need to quiz our model to see how much it has learned. This function runs the model on the test dataset without updating any weights. It simply measures the accuracy: how many images did it classify correctly?
def evaluate(model, loader, device, rank, world_size):
    model.eval()
    correct, total = 0,0

    with torch.no_grad():
        for batch in loader:
            images, labels = batch
            images, labels = images.to(device), labels.to(device)

            preds = model(images).argmax(dim=1)
            correct += (preds==labels).sum().item()
            total += labels.size(0)

    if world_size>1:
        t = torch.tensor([correct,total], device=device)
        dist.all_reduce(t)
        correct, total = t[0].item(), t[1].item()

    if rank==0:
        print(f"Accuracy: {100*correct/total:.2f}%")
6. Tying it all together: the main function
This function orchestrates the entire process. It sets up the distributed environment, loads the data and model, defines the optimizer and loss function, runs the training and evaluation loops for 30 epochs, and finally saves the trained model to a file.
def main():
    local_rank = setup_distributed()
    world_size = int(os.environ.get("WORLD_SIZE",1))
    device = torch.device(f"cuda:{local_rank}")

    train_loader, test_loader, train_sampler = get_dataloader(local_rank, world_size)
    model = SimpleCNN().to(device)
    if world_size>1:
        model = DDP(model, device_ids=[local_rank])

    optimizer = optim.Adam(model.parameters(), lr=1e-3)
    scheduler = StepLR(optimizer, step_size=10, gamma=0.5)  # reduce LR every 10 epochs
    loss_fn   = nn.CrossEntropyLoss()

    num_epochs = 30
    for epoch in range(num_epochs):
        train_one_epoch(model, train_loader, train_sampler, optimizer, loss_fn, device, epoch, local_rank)
        evaluate(model, test_loader, device, local_rank, world_size)
        scheduler.step()  # step the learning rate

    if local_rank==0:
        torch.save(model.module.state_dict() if world_size>1 else model.state_dict(), "cifar10.pth")
        print("Saved model!")

    # -----------------------------
    # Clean exit
    # -----------------------------
    if dist.is_initialized():
        dist.barrier()               # wait for all ranks
        dist.destroy_process_group()

if __name__=="__main__":
    main()
Step 4: Let the training begin!
With our script ready, it's time to kick off the training. We'll use torchrun to launch the script across all 8 of our GPUs. Each GPU will get its own process, and they'll work together to train the model in parallel.
(torch-env) ubuntu@a100-instance:~$ torchrun --nproc_per_node=8 train_cifar.py
W0830 21:54:08.159000 83407 torch/distributed/run.py:793]
W0830 21:54:08.159000 83407 torch/distributed/run.py:793] *****************************************
W0830 21:54:08.159000 83407 torch/distributed/run.py:793] Setting OMP_NUM_THREADS environment variable for each process to be 1 in default, to avoid your system being overloaded, please further tune the variable for optimal performance in your application as needed.
W0830 21:54:08.159000 83407 torch/distributed/run.py:793] *****************************************
Downloading https://www.cs.toronto.edu/~kriz/cifar-10-python.tar.gz to ./data/cifar-10-python.tar.gz
100.0%
Extracting ./data/cifar-10-python.tar.gz to ./data
Files already downloaded and verified
[Epoch 0] Loss: 1.8810
Accuracy: 41.65%
...
...
[Epoch 29] Loss: 0.7983
Accuracy: 71.19%
Saved model!
Look at that! Over 30 epochs, you can see the loss steadily decreasing and the accuracy climbing. Our model started as a random guesser and ended up with over 71% accuracy on the test set. That's a solid result for a simple CNN. Once training is complete, the script saves our model's learned weights into a file named cifar10.pth.
Step 5: Putting your model to the test
Training is done, but the real fun is seeing if our AI can recognize images it has never seen before. This is called inference.
First, let's grab some test images. We can clone a repository that has the CIFAR-10 images sorted into folders.
(torch-env) ubuntu@a100-instance:~$ git clone https://github.com/YoongiKim/CIFAR-10-images.git
Cloning into 'CIFAR-10-images'...
remote: Enumerating objects: 60027, done.
remote: Total 60027 (delta 0), reused 0 (delta 0), pack-reused 60027 (from 1)
Receiving objects: 100% (60027/60027), 19.94 MiB | 110.97 MiB/s, done.
Resolving deltas: 100% (59990/59990), done.
Now, we'll write a simple inference.py script. This script will:
- Load our saved model weights (
cifar10.pth). - Take an image path as an input.
- Preprocess the image just like we did during training.
- Feed it to the model to get a prediction.
- Print the predicted class name.
Here's the code:
import torch
import torch.nn as nn
import torchvision.transforms as transforms
from PIL import Image
import argparse

# ---------------------------------------------------------------------------------------
# Define the model: Recreate the same CNN architecture used during training.
# conv1, conv2, bn1, bn2, pool, fc1, fc2 → convolution, batch norm,
# pooling, fully connected layers.
# forward(self, x) → defines input flow through network to produce class scores (logits)
# ---------------------------------------------------------------------------------------
class SimpleCNN(nn.Module):
    def __init__(self):
        super().__init__()
        self.conv1 = nn.Conv2d(3, 32, 3, padding=1)
        self.bn1   = nn.BatchNorm2d(32)
        self.conv2 = nn.Conv2d(32, 64, 3, padding=1)
        self.bn2   = nn.BatchNorm2d(64)
        self.pool  = nn.MaxPool2d(2,2)
        self.fc1   = nn.Linear(64*8*8, 128)
        self.fc2   = nn.Linear(128, 10)

    def forward(self, x):
        x = torch.relu(self.bn1(self.conv1(x)))
        x = self.pool(x)
        x = torch.relu(self.bn2(self.conv2(x)))
        x = self.pool(x)
        x = x.view(x.size(0), -1)
        x = torch.relu(self.fc1(x))
        return self.fc2(x)

# ---------------------------------------------------------------------------------------
# Parse input argument: Setup command-line input for image path and capture user input
# ---------------------------------------------------------------------------------------
parser = argparse.ArgumentParser(description="Run inference on a CIFAR-10 image")
parser.add_argument("image_path", type=str, help="Path to the image file")
args = parser.parse_args()

# ---------------------------------------------------------------------------------------
# Set device: Use GPU if available, otherwise CPU
# ---------------------------------------------------------------------------------------
device = torch.device("cuda" if torch.cuda.is_available() else "cpu")

# ---------------------------------------------------------------------------------------
# Load trained model: Load only the model weights safely onto the chosen device
# model.load_state_dict(state_dict) → assign the weights
# model.eval() → switch to evaluation mode, disabling dropout and batch norm updates
# ---------------------------------------------------------------------------------------
model = SimpleCNN().to(device)
state_dict = torch.load("cifar10.pth", map_location=device, weights_only=True)
model.load_state_dict(state_dict)
model.eval()

# ---------------------------------------------------------------------------------------
# Prepare image: Preprocess input image (resize, tensor, normalize)
# img = Image.open(...).convert("RGB") → ensure 3 color channels
# img = transform(img).unsqueeze(0).to(device) → add batch dimension and move to device
# ---------------------------------------------------------------------------------------
transform = transforms.Compose([
    transforms.Resize((32,32)),
    transforms.ToTensor(),
    transforms.Normalize((0.5,0.5,0.5),(0.5,0.5,0.5))
])
img = Image.open(args.image_path).convert("RGB")
img = transform(img).unsqueeze(0).to(device)

# ---------------------------------------------------------------------------------------
# Run inference: Forward pass through the model
# with torch.no_grad() → disable gradient computation to save memory and speed up
# preds = model(img).argmax(dim=1).item() → pick class with highest score
# ---------------------------------------------------------------------------------------
with torch.no_grad():
    preds = model(img).argmax(dim=1).item()

# ---------------------------------------------------------------------------------------
# Map output to class name and print result
# ---------------------------------------------------------------------------------------
classes = ["airplane","automobile","bird","cat","deer","dog","frog","horse","ship","truck"]
print(f"Predicted class: {classes[preds]}")
Let's give it a try with a few images: It works! Our model correctly identified a dog, a cat, an airplane, and a truck.
(torch-env) ubuntu@a100-instance:~$ python inference.py /home/ubuntu/CIFAR-10-images/test/dog/0001.jpg
Predicted class: dog

(torch-env) ubuntu@a100-instance:~$ python inference.py /home/ubuntu/CIFAR-10-images/test/cat/0001.jpg
Predicted class: cat

(torch-env) ubuntu@a100-instance:~$ python inference.py /home/ubuntu/CIFAR-10-images/test/airplane/0001.jpg
Predicted class: airplane

(torch-env) ubuntu@a100-instance:~$ python inference.py /home/ubuntu/CIFAR-10-images/test/truck/0001.jpg
Predicted class: truck
Your infrastructure is your advantage
Congratulations! You've just walked through a complete, end-to-end image classification pipeline. You didn't just run some code; you built a system that can learn and make predictions, a foundational skill in the world of AI.
The future is being built with AI. And in this future, your infrastructure isn’t just a cost center — it’s a competitive moat. With a platform like Crusoe Cloud, you can focus on building ambitious, world-changing solutions, knowing you have the performance, scalability, and support to back you up.
Explore Crusoe Cloud and see how our AI-native platform can accelerate your next project.

