Supercharge your AI workloads: A step-by-step guide to deploying NVIDIA Run:ai on Crusoe Managed Kubernetes (CMK)
Master AI orchestration: Follow our 15-step technical guide to deploy NVIDIA Run:ai on Crusoe Managed Kubernetes (CMK). Learn to configure networking, storage (CSI), and Knative for maximum GPU utilization and faster MLOps.


NVIDIA Run:ai is an AI workload and GPU orchestration platform built on Kubernetes, and is now available on Crusoe Managed Kubernetes (CMK). It provides dynamic GPU allocation, intelligent workload scheduling, and resource sharing, ensuring your AI teams get the compute power they need, exactly when they need it.
When you combine Run:ai's powerful orchestration with the robust, scalable, and sustainable infrastructure of CMK, you get a reliable platform for accelerating your AI development cycles.
This guide walks you through deploying the NVIDIA Run:ai platform on a CMK cluster and submitting training and inference jobs.
NVIDIA Run: ai Components
NVIDIA Run:ai is made up of two components:
- NVIDIA Run:ai control plane: Provides resource management, handles workload submission, and provides cluster monitoring and analytics. The NVIDIA Run:ai control plane is available as-a-Service or installable on the Kubernetes cluster.
- NVIDIA Run:ai cluster: Provides scheduling and workload management, extending Kubernetes native capabilities and is always installed in Kubernetes.
Prerequisites: Tools, credentials, and cluster requirements
Before you begin, make sure you have the following:
1) A Crusoe Cloud account with permissions to create CMK clusters
2) The crusoe CLI installed and configured
3) kubectl + helm installed
4) An NVIDIA Run:ai license key (required to pull container images)
5) A domain name you control (we'll use runai.crusoecloud.site in this example)
Phase I: CMK setup
Step 1: Provision your CMK cluster
- Provision a CMK cluster with a nodepool of desired SKU.
- Ensure to select the add-ons during creation: nvidia_gpu_operator, nvidia_network_operator, crusoe_csi, and cluster_autoscaler.
- Create the necessary namespaces for NVIDIA Run:ai components: runai-backend (for the control plane) and runai (for the cluster-side components).
kubectl create namespace runai-backend
kubectl create namespace runai
Step 2: Configure Crusoe CSI storage
- The crusoe_csi add-on installs the required CSI drivers. Create a StorageClass to make the SSD storage available for PersistentVolumeClaims (PVCs).
apiVersion: storage.k8s.io/v1
kind: StorageClass
metadata:
  name: crusoe-csi-driver-ssd-sc
  annotations:
    storageclass.kubernetes.io/is-default-class: "true"
provisioner: ssd.csi.crusoe.ai
volumeBindingMode: WaitForFirstConsumer
allowVolumeExpansion: true
kubectl apply -f persistent-crusoe-csi-sc.yamlPhase II: Network and control plane readiness
Step 3: Set up load balancing + ingress
Install the Crusoe Load Balancer Controller and the NGINX Ingress Controller to expose the NVIDIA Run:ai control plane to the internet.
- Crusoe Load Balancer Controller: Automates provisioning Crusoe Cloud load balancers for Service objects of type LoadBalancer.
- NGINX Ingress Controller: Manages external access to services in the cluster, handling routing, SSL, etc.
git clone https://github.com/crusoecloud/crusoe-load-balancer-controller-helm-charts.git

helm install crusoe-lb-controller
./crusoe-load-balancer-controller-helm-charts/charts/crusoe-lb-controller --namespace crusoe-system --create-namespace
- Create an ingress-nginx-values.yaml YAML file to set service type to LoadBalancer and then reference the same in helm install for NGINX Ingress Controller.
controller:
  replicaCount: 1
  config:
    worker-rlimit-nofile: "65536"
    worker-processes: "auto"
    worker-connections: "16384"
  resources:
    limits:
      memory: 1Gi
      cpu: 1000m
    requests:
      memory: 512Mi
      cpu: 500m
  service:
    type: LoadBalancer # This will trigger the Crusoe LB Controller
  admissionWebhooks:
    enabled: true
  metrics:
    enabled: false
helm repo add ingress-nginx https://kubernetes.github.io/ingress-nginx
helm repo update
helm install ingress-nginx ingress-nginx/ingress-nginx \
--namespace ingress-nginx \
--create-namespace \
--values ingress-nginx-values.yaml- Retrieve the external IP address assigned to your Ingress controller.
kubectl get svc -n ingress-nginx

NAME      			 TYPE         CLUSTER-IP      EXTERNAL-IP      PORT(S)     AGE
ingress-nginx-controller LoadBalancer  10.233.26.64   212.56.170.192   80:30407/TCP, 443:31693/TCP   4m11s


ingress-nginx-controller-admission   ClusterIP  10.233.35.89   <none>    443/TCP    4m11s
Step 4: Configure DNS + firewall
- Update your DNS A record to point to the Ingress controller's external IP (e.g., 212.56.170.192), then use your vpc-network-id (found in the Crusoe Cloud console or CLI) to create a firewall rule allowing traffic to the controller's NodePorts (e.g., 30407 and 31693), and finally check if your domain is reachable on ports 80 and 443.
$ nslookup runai.crusoecloud.site
Name:	runai.crusoecloud.site
Address: 212.56.170.192
crusoe networking vpc-firewall-rules create \
--name nginx-ingress-fw-rule \
--action ALLOW \
--destination-ports 30407,31693 \
--destinations <YOUR-CLUSTER-SUBNET-CIDR> \
--protocols tcp \
--source-ports 1-65535 \
--sources 0.0.0.0/0 \
--direction INGRESS \
--vpc-network-id <YOUR-VPC-ID>$ nc -zv runai.crusoecloud.site 443
Connection to runai.crusoecloud.site port 443 [tcp/httpshttps] succeeded!
$ nc -zv runai.crusoecloud.site 80
Connection to runai.crusoecloud.site port 80 [tcp/http] succeeded!Step 5: Install cert-manager (for HTTPS)
- Install Cert-Manager and configure a ClusterIssuer to automatically provision and renew Let's Encrypt TLS certificates, securing your NVIDIA Run:ai dashboard with HTTPS.
helm repo add jetstack https://charts.jetstack.io
helm repo update
helm install cert-manager jetstack/cert-manager \
  --namespace cert-manager \
  --create-namespace \
  --version v1.18.2 \
  --set installCRDs=true
apiVersion: cert-manager.io/v1
kind: ClusterIssuer
metadata:
name: letsencrypt-prod
spec:
acme:
server: https://acme-v02.api.letsencrypt.org/directory
email: <your-email>
privateKeySecretRef:
name: letsencrypt-prod
solvers:
- http01:
ingress:
class: nginxkubectl apply -f cluster-issuer-cert-manager.yamlStep 6: Install the NVIDIA Run:ai control plane
- Now that you're ready to install the NVIDIA Run:ai components, create a Kubernetes secret in both namespaces using your NVIDIA RUN:ai License Key, which allows the cluster to pull the necessary Run:ai container images.
# Secret for the Control Plane namespace
kubectl create secret docker-registry runai-reg-creds \
  --docker-server="https://runai.jfrog.io" \
  --docker-username="self-hosted-image-puller-prod" \
  --docker-password="<YOUR-RUN:AI-LICENSE-KEY>" \
  --docker-email="<your-email>" \
  --namespace="runai-backend"

# Secret for the Cluster namespace
kubectl create secret docker-registry runai-reg-creds \
  --docker-server="https://runai.jfrog.io" \
  --docker-username="self-hosted-image-puller-prod" \
  --docker-password="<YOUR-RUN:AI-LICENSE-KEY>" \
  --docker-email="<your-email>" \
  --namespace="runai"
- Install the Run:ai control plane via Helm, and then verify that all pods in the runai-backend namespace are in a running state.
helm repo add runai-backend https://runai.jfrog.io/artifactory/cp-charts-prod
helm repo update

helm install runai-backend -n runai-backend runai-backend/control-plane \
  --set global.domain=runai.crusoecloud.site \
  --set global.ingress.enabled=false # We set this to false because we will create our own Ingress
- Create a custom Ingress resource that uses Cert-Manager certificates configured in step 6.
apiVersion: networking.k8s.io/v1
kind: Ingress
metadata:
  name: runai-backend-ingress
  namespace: runai-backend
  annotations:
    cert-manager.io/cluster-issuer: letsencrypt-prod # Tells Cert-Manager to use issuer
spec:
  ingressClassName: nginx
  rules:
  - host: <runai.crusoecloud.site> # Replace with your domain
    http:
      paths:
      - backend:
          service:
            name: runai-backend-traefik # The internal Run:ai service
            port:
              name: http
        path: /
        pathType: Prefix
  tls:
  - hosts:
    - <runai.crusoecloud.site>       # Replace with your domain
    secretName: runai-backend-tls    # Cert-Manager will create this secret with the cert
kubectl apply -f runai-backend-ingress.yaml- Cert-Manager will then detect the Ingress, perform the HTTP challenge, and get a certificate from Let's Encrypt.
# Check that the certificate is ready
kubectl get certificate -n runai-backend

NAME                READY   SECRET              AGE
runai-backend-tls   True    runai-backend-tls   55s

# Check that the secret was created
kubectl get secret -n runai-backend | grep tls
runai-backend-tls    kubernetes.io/tls     2    24s
- Open your browser and navigate to https://runai.crusoecloud.site, log in with the default credentials (User: test@run.ai, Password: Abcd!234), and then follow the on-screen prompts to change this password and provide a cluster name.
Phase III: Core NVIDIA Run:ai deployment
Step 7: Install Prometheus
- NVIDIA Run:ai cluster requires Prometheus to be installed for cluster monitoring. Install the kube-prometheus-stack via Helm before proceeding to cluster components.
helm repo add prometheus-community https://prometheus-community.github.io/helm-charts
helm repo update
helm upgrade --install prometheus-stack prometheus-community/kube-prometheus-stack \
  --namespace monitoring \
  --create-namespace
Step 8: Install the NVIDIA Run:ai cluster components
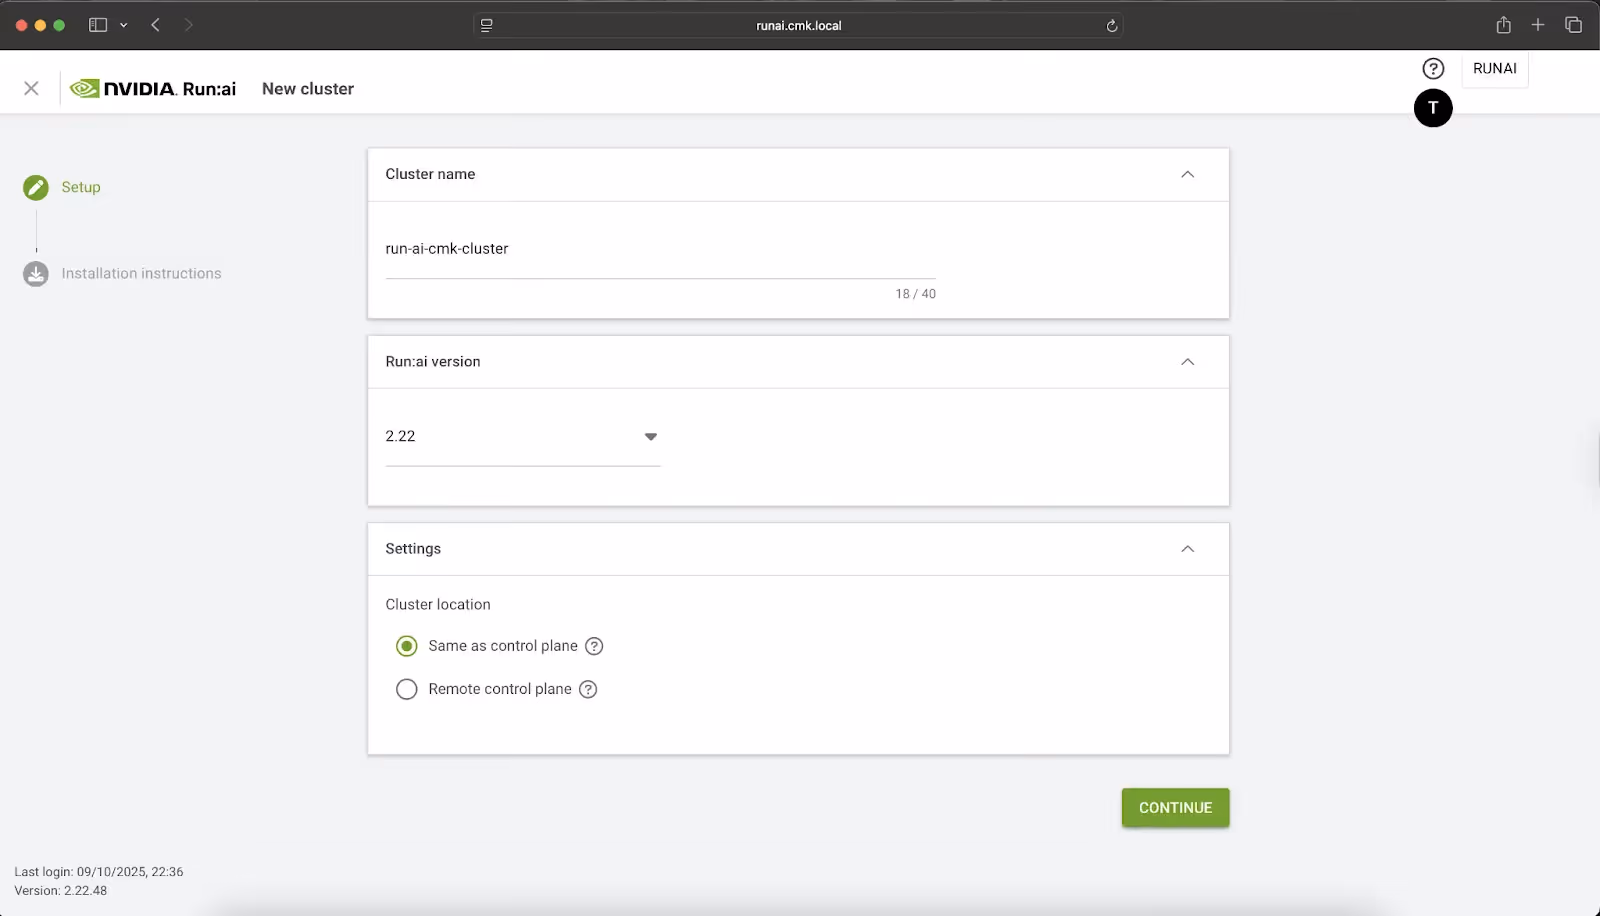
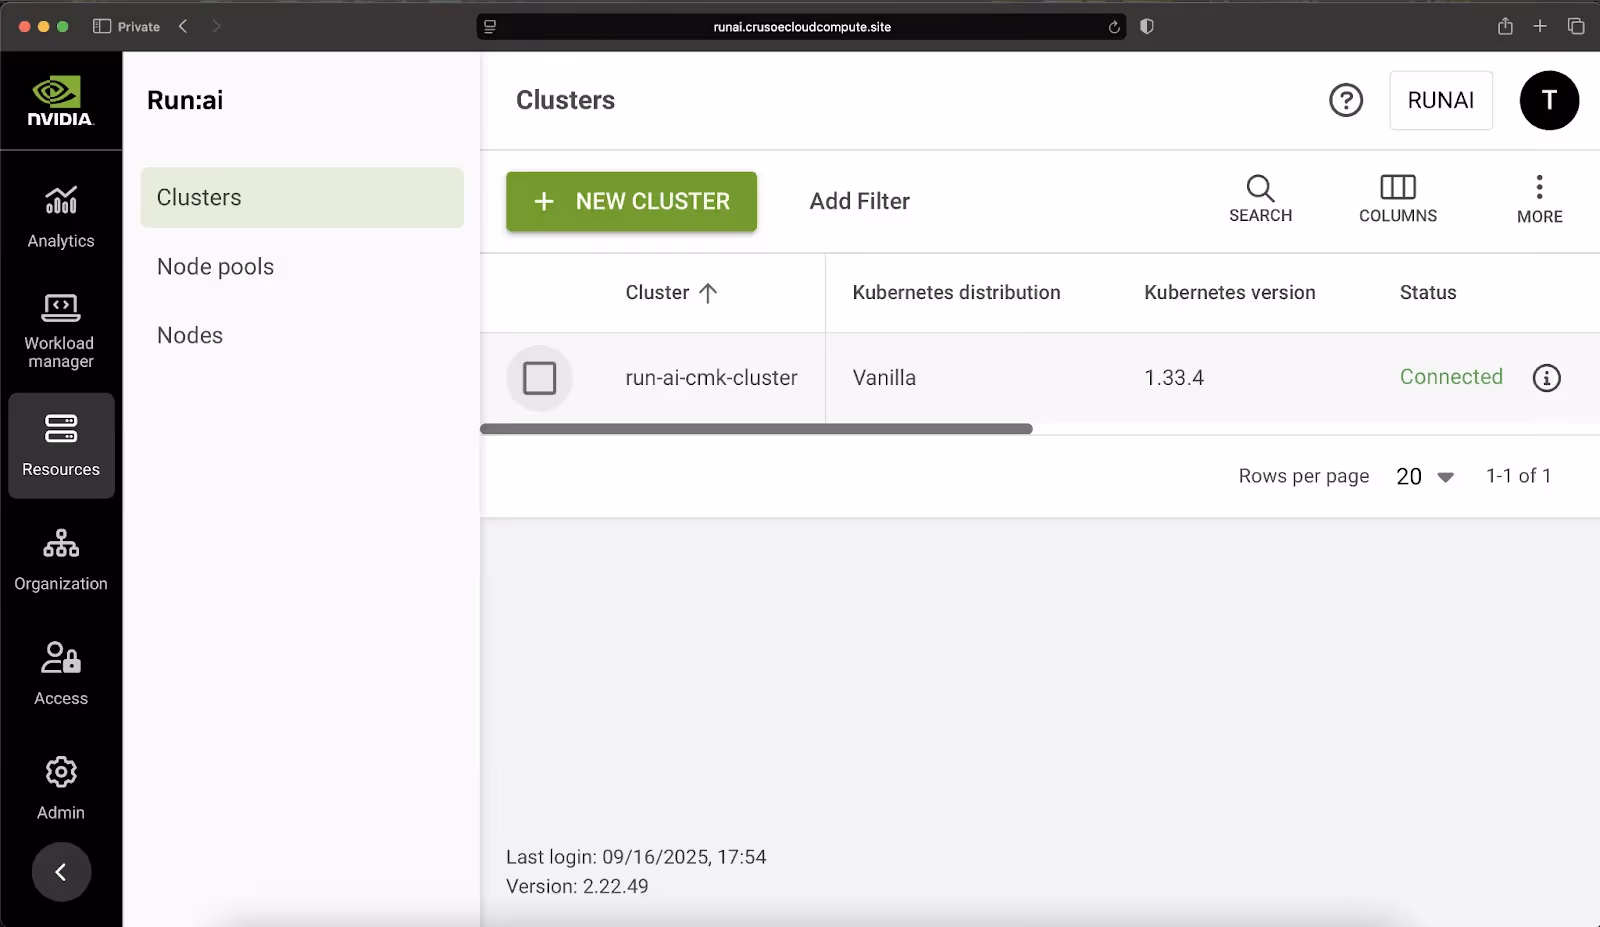
- In the NVIDIA Run:ai U/I, navigate to Settings > Clusters > Add New Cluster, select the location as Same as control plane, then retrieve the Client ID and Secret, and finally install the cluster components via Helm.
helm repo add runai https://runai.jfrog.io/artifactory/api/helm/run-ai-charts --force-update
helm repo update

helm upgrade -i runai-cluster runai/runai-cluster -n runai \
  --set controlPlane.url=runai.crusoecloud.site \
  --set controlPlane.clientSecret=<YOUR-CLIENT-SECRET-FROM-UI> \
  --set cluster.uid=<YOUR-CLIENT-ID-FROM-UI> \
  --set cluster.url=runai.crusoecloud.site \
  --version="2.22.48" \
  --create-namespace
- Ensure all pods in the runai namespace are running, and after confirming compatibility for your version (noting this is 2.22.48) against the supported K8s versions in the compatibility matrix, install the Run:ai CLI (runai) and check the status of your cluster nodes.
$ runai describe node
NAME:        np-80058340-1.us-southcentral1-a.compute.internal
STATUS:      Ready
...
GPU:
  TYPE:         NVIDIA-H100-80GB-HBM3
  CAPACITY:     8
  ALLOCATABLE:  8.00
  ALLOCATED:    0.00
  FREE:         8.00
  UNHEALTHY:    0
────────────────────────
NAME:        np-80058340-3.us-southcentral1-a.compute.internal
STATUS:      Ready
...
GPU:
  TYPE:         NVIDIA-H100-80GB-HBM3
  CAPACITY:     8
  ALLOCATABLE:  8.00
  ALLOCATED:    0.00
  FREE:         8.00
  UNHEALTHY:    0
- Success! Your CMK cluster nodes with NVIDIA H100 GPUs, are fully recognized and managed by the NVIDIA Run:ai platform.
Phase IV: Advanced AI workflow enablement
Step 9: Enable advanced workloads (Kubeflow, MPI, + Knative)
To support full MLOps capabilities, including distributed training and serverless inference, install the following.
- Kubeflow Training & MPI Operators: Enables distributed training jobs.
kubectl apply --server-side -k "github.com/kubeflow/training-operator.git/manifests/overlays/standalone?ref=v1.9.2"

kubectl patch deployment training-operator -n kubeflow --type='json' -p='[{"op": "add", "path": "/spec/template/spec/containers/0/args", "value": ["--enable-scheme=tfjob", "--enable-scheme=pytorchjob", "--enable-scheme=xgboostjob", "--enable-scheme=jaxjob"]}]'
kubectl delete crd mpijobs.kubeflow.org

kubectl apply --server-side -f https://raw.githubusercontent.com/kubeflow/mpi-operator/v0.6.0/deploy/v2beta1/mpi-operator.yaml
- Knative Serving: Enables request-based autoscaling, routing, and scale-to-zero deployments for inference services.
helm repo add knative-operator https://knative.github.io/operator
helm install knative-operator --create-namespace --namespace knative-operator knative-operator/knative-operator
kubectl get deployment -n knative-operator
NAME READY UP-TO-DATE AVAILABLE AGE
knative-operator 1/1 1 1 14d
operator-webhook 1/1 1 1 14d- Install Knative-serving on the cluster as per requirement with different network layer options. Below example uses Kourier as the networking layer.
apiVersion: v1
kind: Namespace
metadata:
  name: knative-serving
---
apiVersion: operator.knative.dev/v1beta1
kind: KnativeServing
metadata:
  name: knative-serving
  namespace: knative-serving
spec:
  # ...
  ingress:
    kourier:
      enabled: true
  config:
    network:
      ingress-class: "kourier.ingress.networking.knative.dev"
kubectl apply -f knative-serving.yaml- Ensure all pods in the knative-serving namespace are in running state.
$ kubectl get service -n knative-serving | grep LoadBalancer
kourier    LoadBalancer  10.233.15.4   216.84.151.16  80:31934/TCP,
443:32484/TCP   7h13m
- Create firewall rule for Kourier service to allow traffic to the NodePorts (e.g., 30407 and 31693). Find vpc-network-id from the Crusoe Cloud console or CLI.
crusoe networking vpc-firewall-rules create \
  --name kourier-ingress-fw-rule \
  --action ALLOW \
  --destination-ports 31934,32484 \
  --destinations <YOUR-CLUSTER-SUBNET-CIDR> \
  --protocols tcp \
  --source-ports 1-65535 \
  --sources 0.0.0.0/0 \
  --direction INGRESS \
  --vpc-network-id <YOUR-VPC-ID>
$ nc -vz 216.84.151.16 80
Connection to 216.84.151.16 port 80 [tcp/http] succeeded!- To configure Knative to use a reachable domain so you can access services externally without changing real DNS or relying on Magic DNS. To utilize the Run:ai scheduler and other features, also apply patches to configmap.
kubectl patch configmap/config-domain \
  -n knative-serving \
  --type merge \
  --patch '{"data":{"216.84.151.16.sslip.io":""}}'

kubectl patch configmap/config-autoscaler \
  --namespace knative-serving \
  --type merge \
  --patch '{"data":{"enable-scale-to-zero":"true"}}' && \
kubectl patch configmap/config-features \
  --namespace knative-serving \
  --type merge \
  --patch '{"data":{"kubernetes.podspec-schedulername":"enabled","kubernetes.podspec-nodeselector": "enabled","kubernetes.podspec-affinity":"enabled","kubernetes.podspec-tolerations":"enabled","kubernetes.podspec-volumes-emptydir":"enabled","kubernetes.podspec-securitycontext":"enabled","kubernetes.containerspec-addcapabilities":"enabled","kubernetes.podspec-persistent-volume-claim":"enabled","kubernetes.podspec-persistent-volume-write":"enabled","multi-container":"enabled","kubernetes.podspec-init-containers":"enabled","kubernetes.podspec-fieldref":"enabled"}}'
You have now successfully deployed the entire NVIDIA Run:ai platform on Crusoe Managed Kubernetes. It's time to start submitting training jobs and watch your GPU utilization soar!
Phase V: Launching a distributed training job
Step 10: Create a project + credentials object
- Create an NVIDIA Run:ai Project in the UI, which corresponds to a Kubernetes Namespace and is the foundational unit for setting quotas and organizing workloads.
$ kubectl get ns runai-cmk-test-project
NAME                     STATUS   AGE
runai-cmk-test-project   Active   41s
- Create a Credentials object (Secret) in the Run:ai U/I for your container registry (e.g., Crusoe Container Registry) to allow your workloads to pull images. More information about Crusoe Container Registry can be found in the Container Registry.
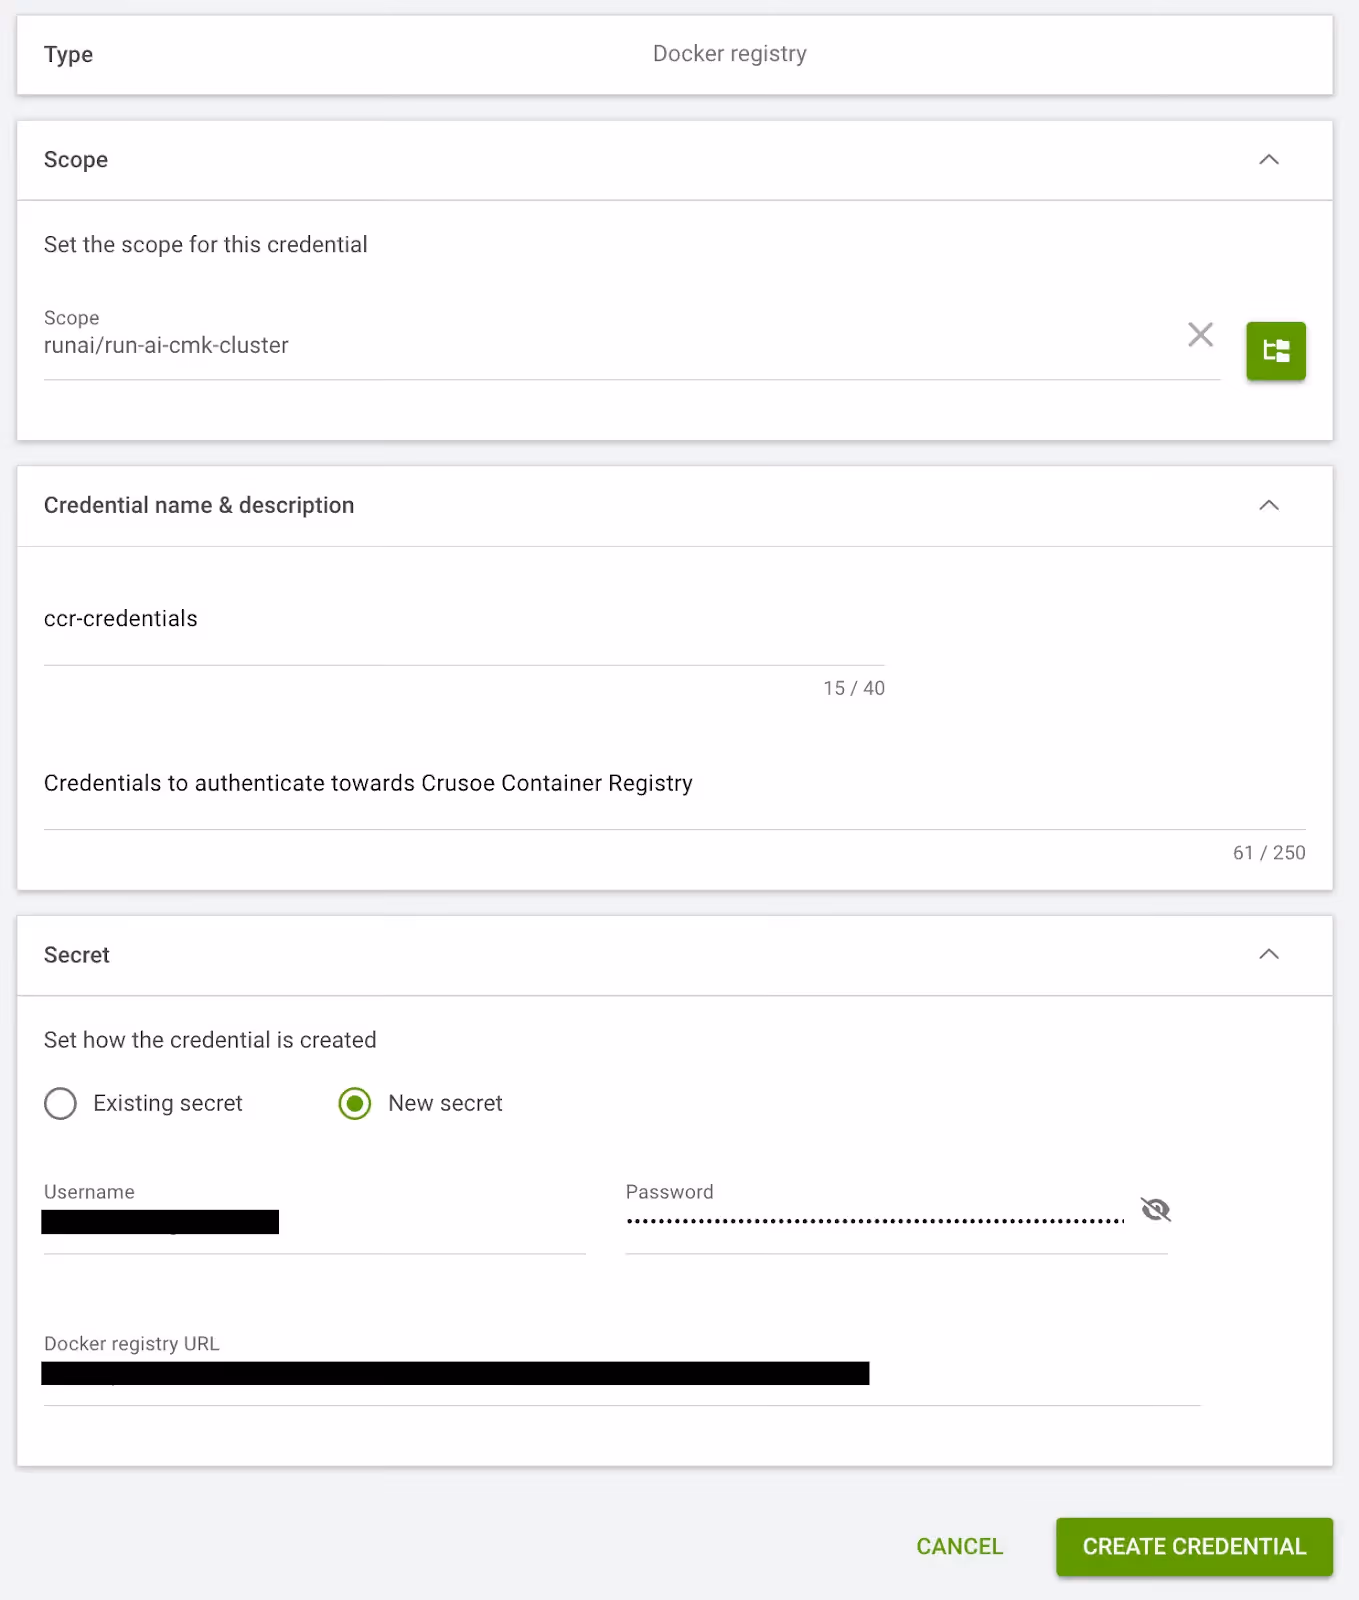
$ kubectl get secret dockerregistry-ccr-credentials -n runai-cmk-test-project
NAME                             TYPE                             DATA   AGE
dockerregistry-ccr-credentials   kubernetes.io/dockerconfigjson   1      2m11s
Step 11: Create PVC/PV to store training data
- Create Persistent Volume Claim (PVC) and Persistent Volume (PV) to store your training data.
- Go to Workload manager > Data sources > New Data Source.
- Here we specify container path as /datasets and size of 300 TB.
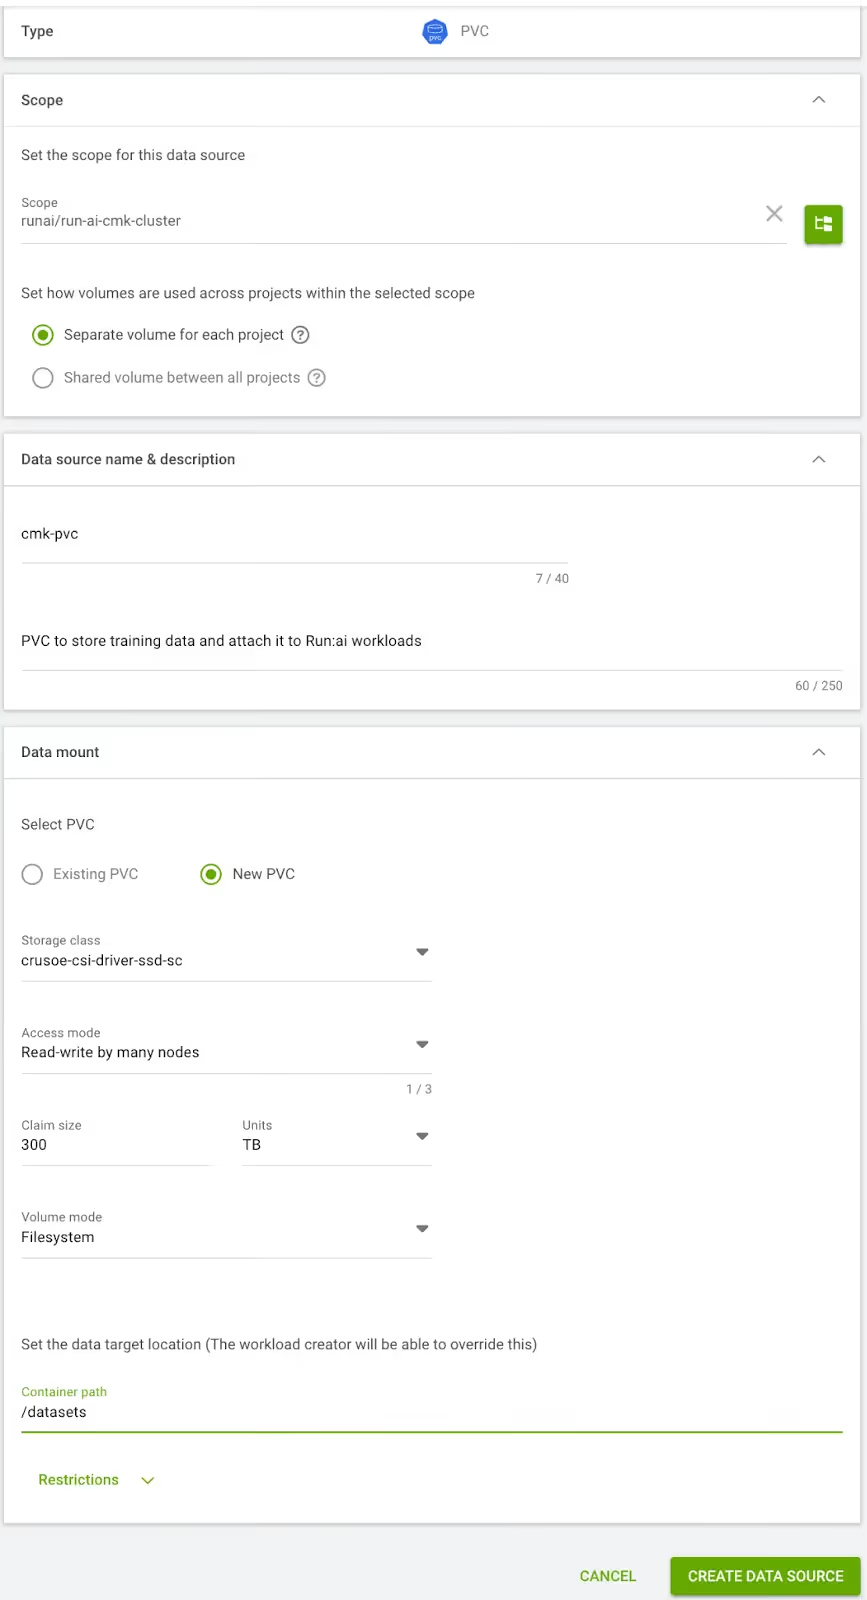
$ kubectl get pvc -n runai-cmk-test-project

NAME   	STATUS    	VOLUME   	CAPACITY   	ACCESS MODES   	STORAGECLASS               VOLUMEATTRIBUTESCLASS   AGE
persistentvolumeclaim/cmk-pvc-run-ai-cmk-cluster-kq0h5  Pending                                      crusoe-csi-driver-ssd-sc   <unset>    4m9s
- You can now create a PV object where you’ll store the training data, and associate this PV to the PVC you just created.
$ kubectl get pv,pvc -n runai-cmk-test-project


NAME  CAPACITY   ACCESS MODES   RECLAIM POLICY   STATUS   CLAIM                                                     STORAGECLASS  VOLUMEATTRIBUTESCLASS   REASON   AGE


persistentvolume/mlperf-test-dataset-pv   300Ti      RWX            Retain           Bound    runai-cmk-test-project/cmk-pvc-run-ai-cmk-cluster-kq0h5   crusoe-csi-driver-ssd-sc   <unset>    32d

--
NAME  STATUS   VOLUME   CAPACITY   ACCESS MODES   STORAGECLASS               VOLUMEATTRIBUTESCLASS   AGE


persistentvolumeclaim/cmk-pvc-run-ai-cmk-cluster-kq0h5   Bound   mlperf-test-dataset-pv 	300Ti 	     RWX  	crusoe-csi-driver-ssd-sc 	<unset>    6m43s
Step 12: Create a Compute Resource
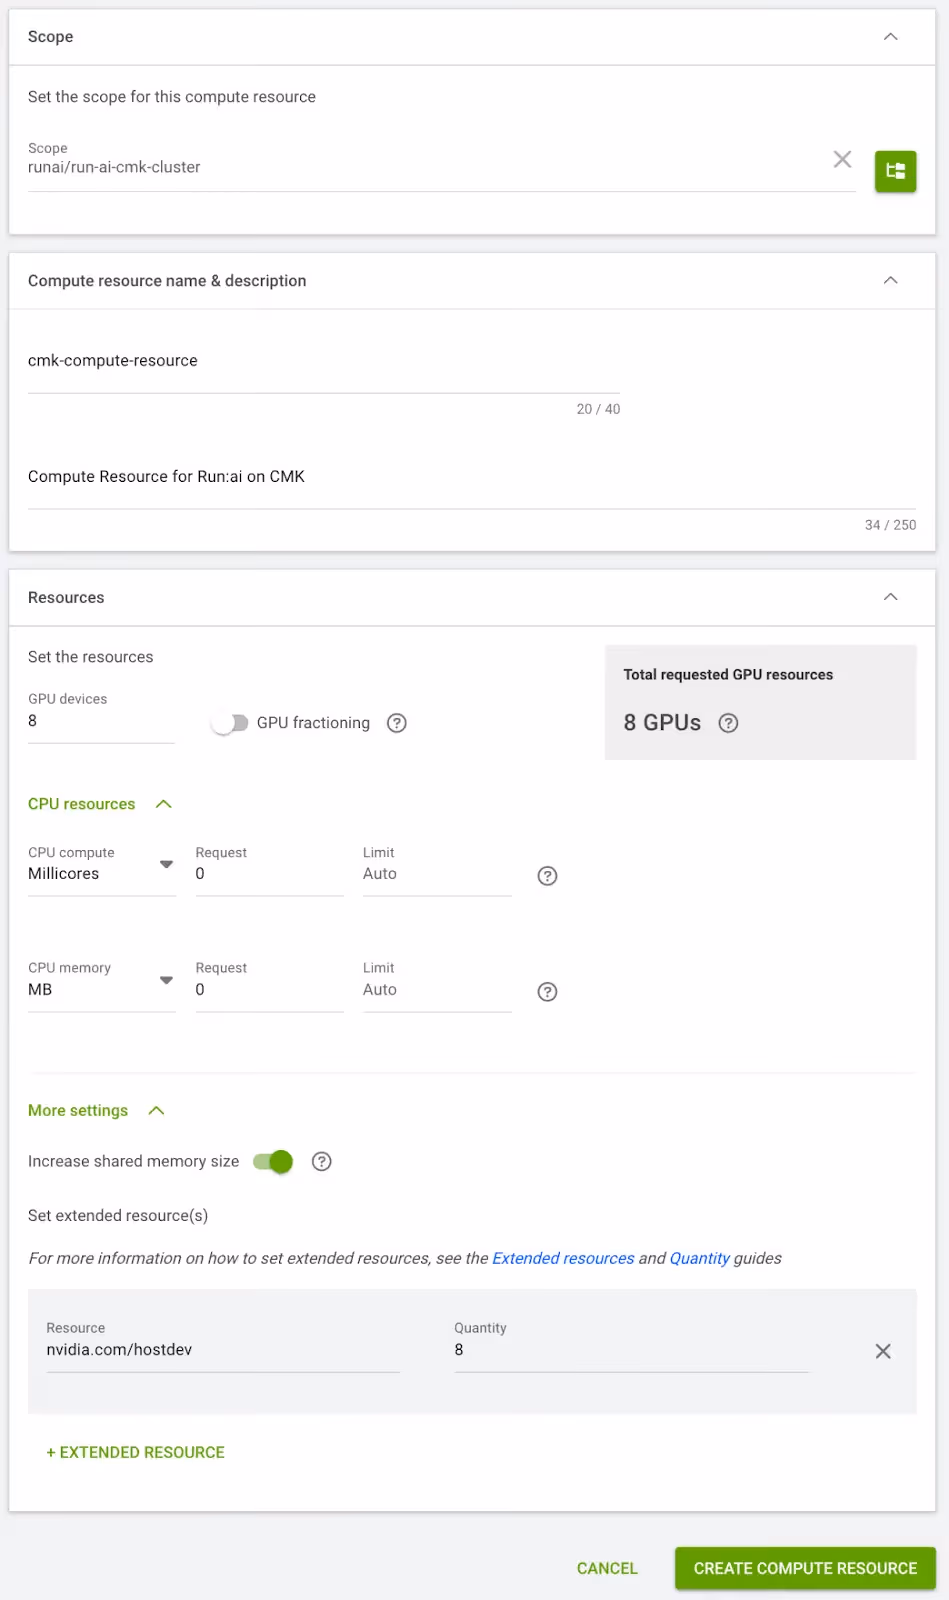
- Define a Compute Resource and ensure you add the nvidia.com/hostdev extended resource. To do the same in U/I, go to Workload manager > Compute resources > New Compute Resource.
- Set 8 GPUs per device, enable Increase shared memory size and add nvidia.com/hostdev: 8.
- The nvidia.com/hostdev extended resource can be referenced in describe output of CMK nodes.
$ kubectl describe no np-80058340-7.us-southcentral1-a.compute.internal
Allocatable:
  nvidia.com/gpu:      8
  nvidia.com/hostdev:  8
- The nvidia.com/hostdev resource exposes the high-speed InfiniBand NICs (HCAs) to the containers, enabling RDMA (Remote Direct Memory Access). This is essential for low-latency, multi-node communication, allowing your PyTorch Distributed Data Parallel (DDP) jobs to scale efficiently across multiple CMK nodes.
Step 13: Create a training job Environment
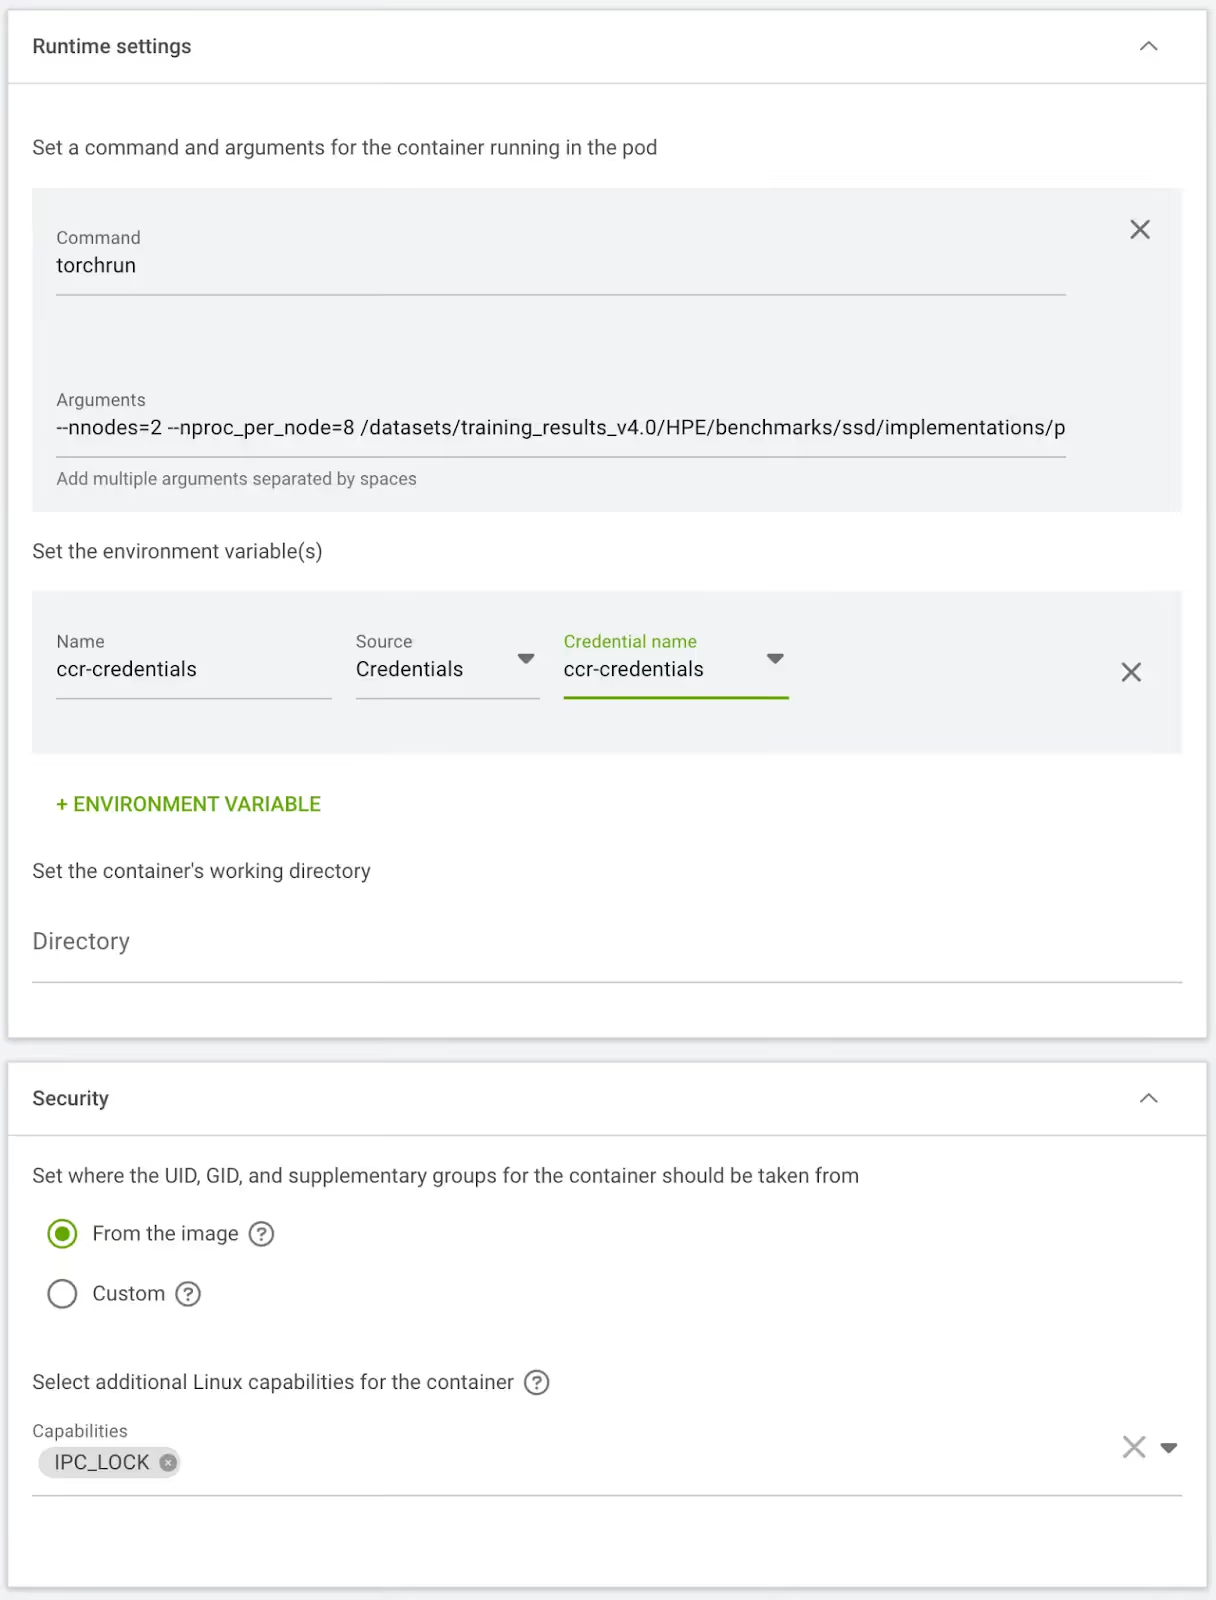
- Define the training Environment in U/I (Workload manager > Environments > New Environment), specifying the container image, selecting Distributed Architecture > PyTorch > Training framework and entering the torchrun command for the multi-node job.
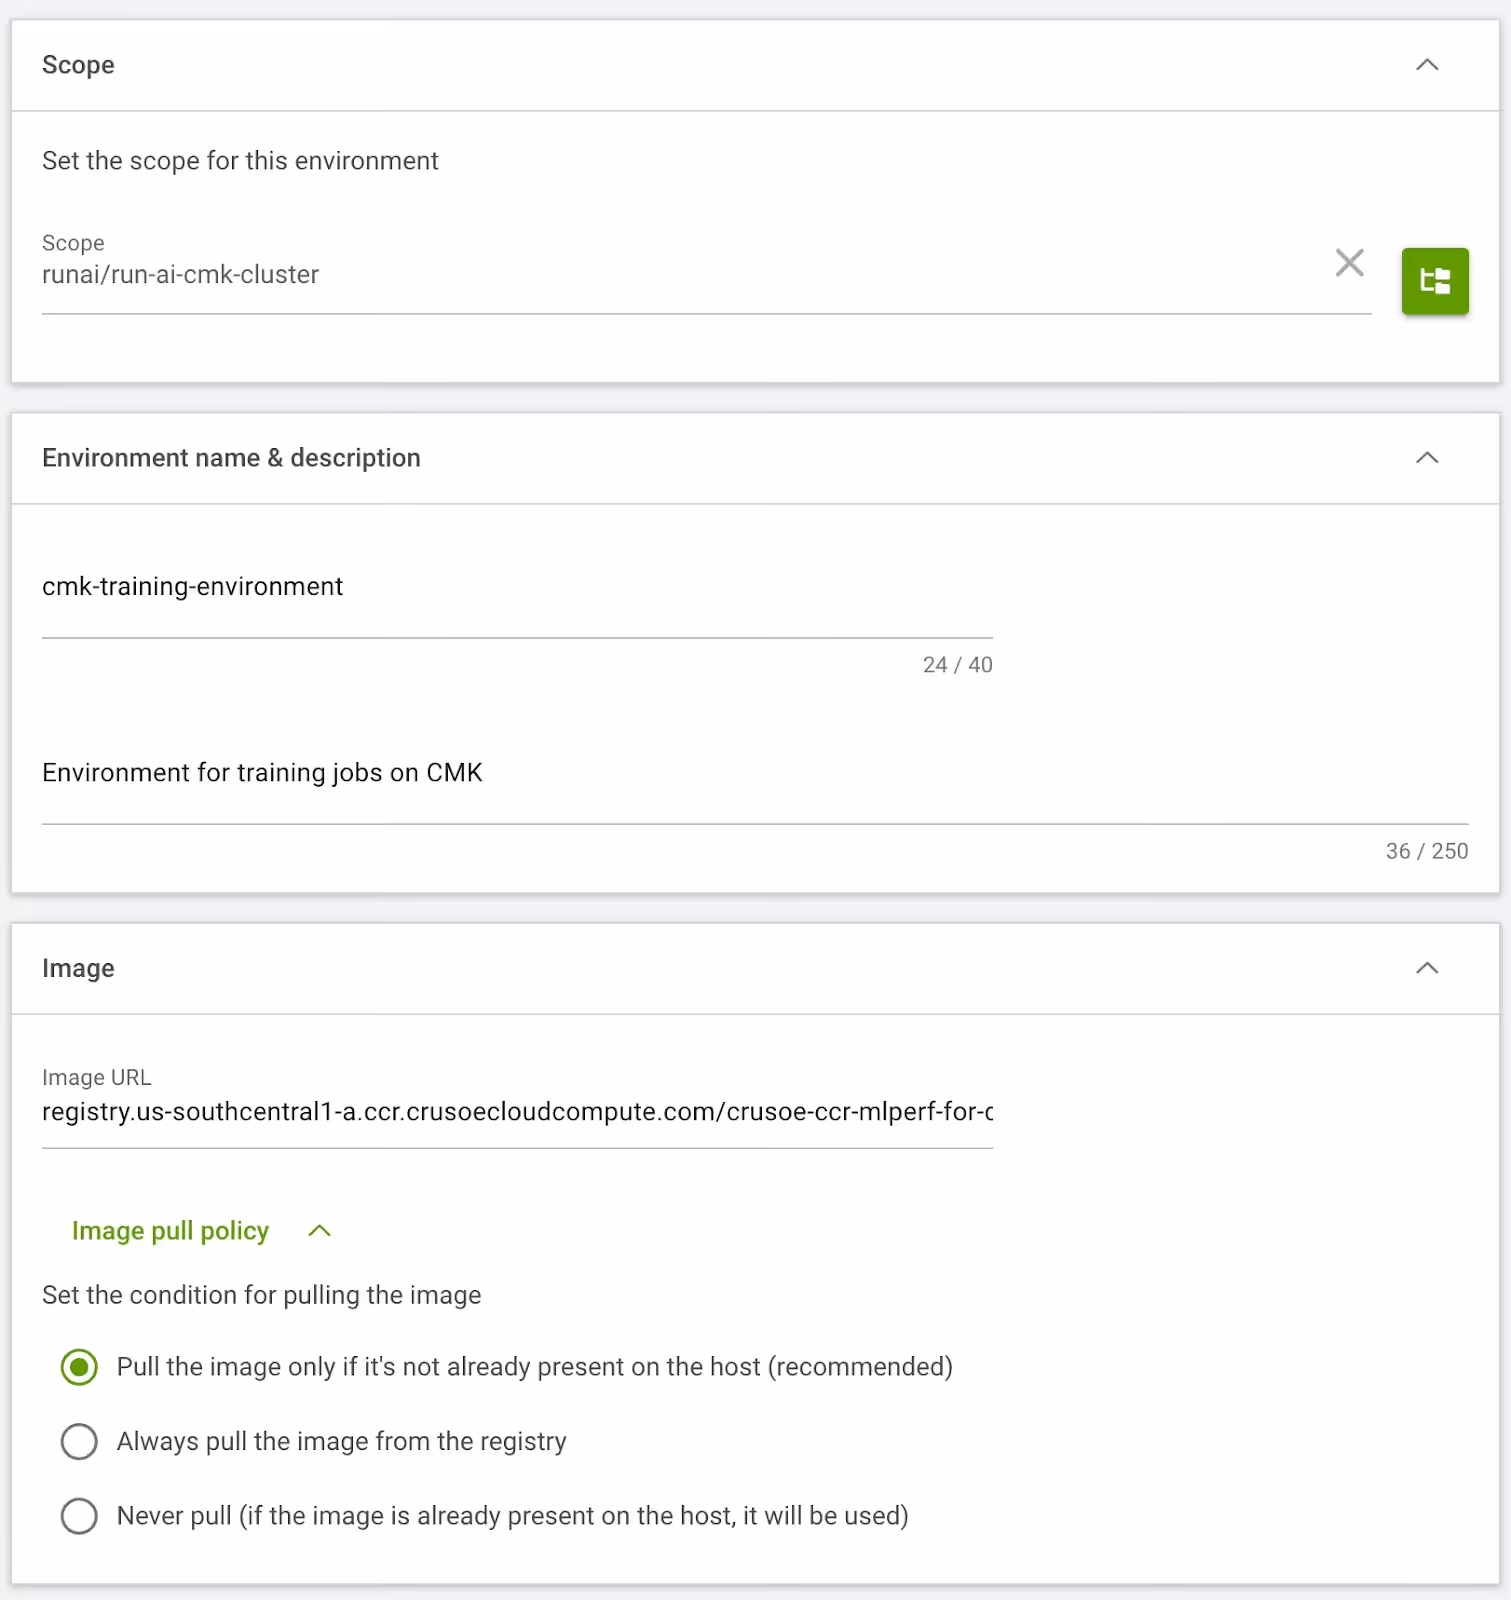
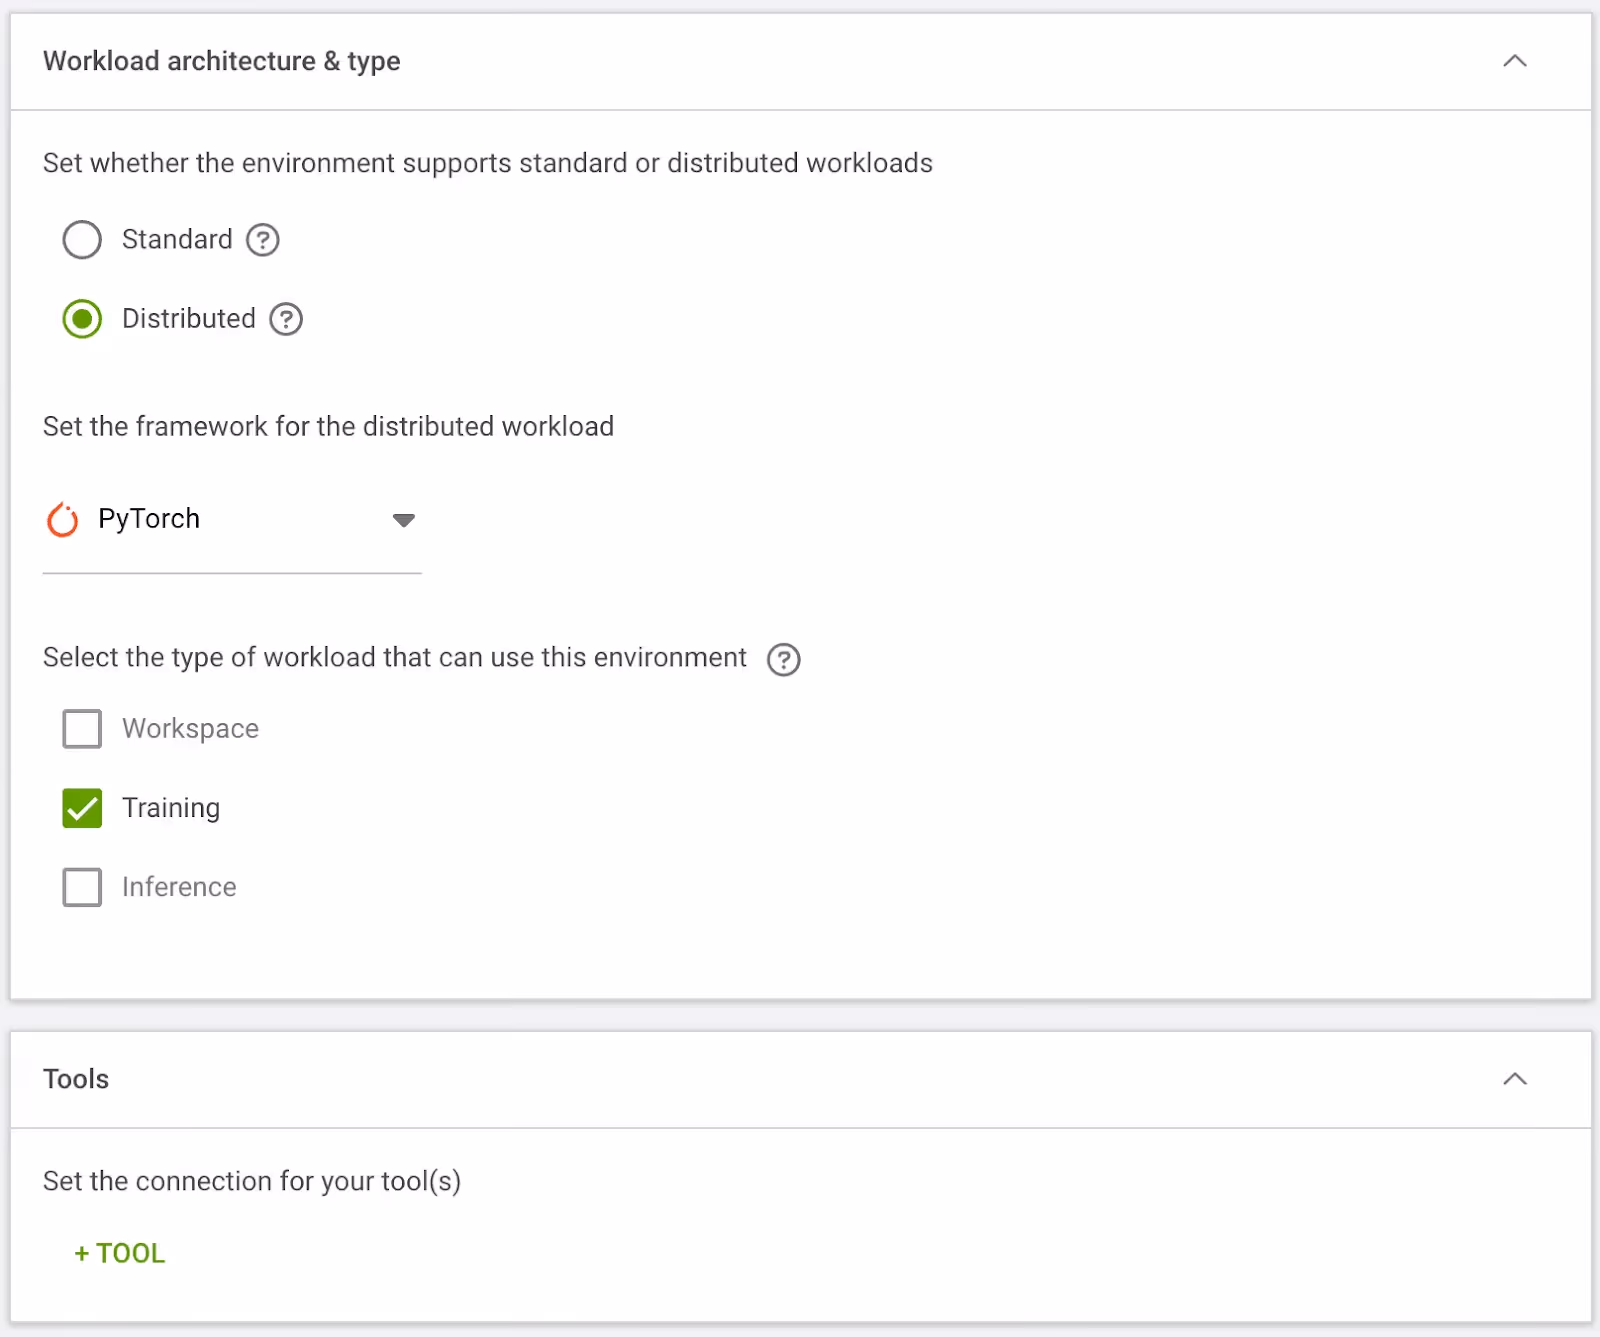
torchrun --nnodes=2 \
--nproc_per_node=8 \
/datasets/training_results_v4.0/HPE/benchmarks/ssd/implementations/pytorch/train.py \
--dataset-path "/datasets/openimages" \
--epochs 10 \
--lr 0.0001 \
--batch-size 32 \
--output-dir "/datasets/results"
- This configuration launches a distributed training job for an SSD model from mlcommons using the train.py script, running across 16 total processes (8 per node, 1 per GPU). The training is set for 10 epochs with a 0.0001 learning rate and a batch size of 32 per process, resulting in a global batch size of 512. Registry credentials are passed as an Environment Variable, the IPC_LOCK capability is enabled for the containers, and all outputs are written to /datasets/results.
Step 14: Launch a training workload
- Navigate to Workload manager > Workloads > New Workload > Training, select your Project, and set the Workload Architecture to Distributed. For this PyTorch job, set the Configuration to Workers & Master, choose the Start from scratch template, and assign a Training Name.
- Configure the job by selecting the Environment (from step 13), the Compute Resource (from step 12, leaving Workers as 1), and the Data Sources PVC (from step 11). Finally, add the annotation k8s.v1.cni.cncf.io/networks: hostdev-rdma-device under General, leave the Master configuration as default, and proceed with Create Training.

$ kubectl get po -n runai-cmk-test-project
NAME                    READY   STATUS              RESTARTS   AGE
cmk-training-master-0   0/1     ContainerCreating   0          3m7s
cmk-training-worker-0   0/1     Init:0/1            0          3m7s
$ kubectl get po -n runai-cmk-test-project -o wide

NAME                    READY   STATUS    RESTARTS   AGE   IP             NODE                                                 NOMINATED NODE   READINESS GATES


cmk-training-master-0   1/1     Running   0          12m   10.234.9.250   np-80058340-12.us-southcentral1-a.compute.internal   <none>           <none>
cmk-training-worker-0   1/1     Running   0          12m   10.234.5.252   np-80058340-7.us-southcentral1-a.compute.internal    <none>           <none>
- Once the training job finishes, you can see the Completed status on the Run:ai Dashboard, confirm this in the corresponding pod output, and find the total training time in the workload pod logs.
$ kubectl get po -n runai-cmk-test-project
NAME                    READY   STATUS      RESTARTS   AGE
cmk-training-master-0   0/1     Completed   1          13h
cmk-training-worker-0   0/1     Completed   1          13h
Run time 1:43:15Phase VI: Serverless inference deployment
Step 15: Launch an inference workload
- Run:ai gives access to deploying Open Source models via Hugging Face. We’ll deploy a single replica Llama-3.2-1B-Instruct inference job from the Models list. To do this, in U/I, navigate to Workload manager > Models and click on Deploy for the model name.
- Then select the Project, assign a Name to the workload, provide a Token or Credential to authenticate with Hugging Face (being aware that the model provider's Terms & Conditions may need to be accepted for the token to be valid). Select the Compute Resource created in step 14, and add the k8s.v1.cni.cncf.io/networks: hostdev-rdma-device annotation under the General settings.
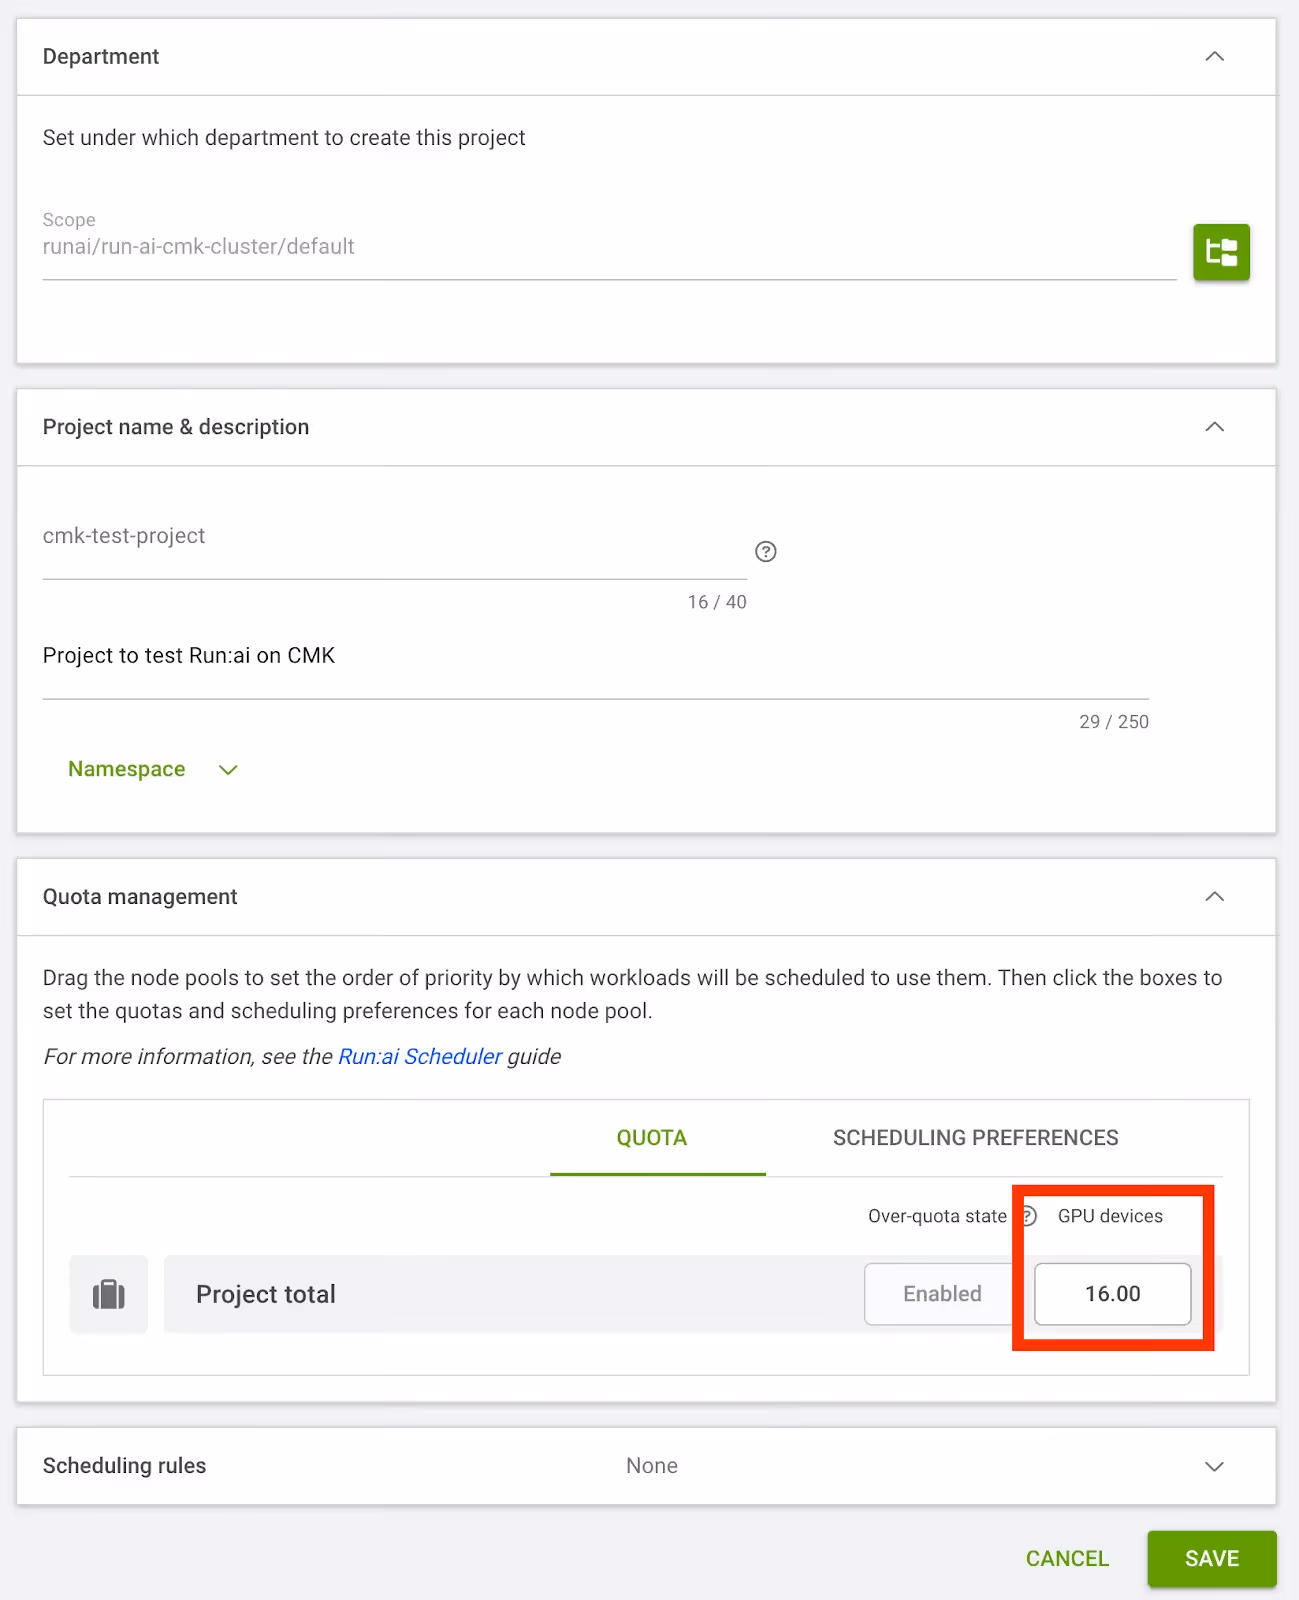
- Click Create Inference and if the workload gets stuck in Pending status, check the inference pod status; if a Quota warning is observed, resolve it by going to Organization > Projects > Select the Project > Edit and increase the GPU Devices Quota.
$ kubectl get po -n runai-cmk-test-project
NAME                           READY   STATUS      RESTARTS   AGE
cmk-inference-workload-<>      0/2     Pending        0       2m13s

$ kubectl describe pod -n runai-cmk-test-project cmk-inference-workload-<>
...
Events:
  Type     Reason         Age                 From             Message
  ----     ------         ----                ----             -------
  Warning  Unschedulable  2s (x22 over 107s)  runai-scheduler  NonPreemptibleOverQuota: Non-preemptible workload is over quota. Workload requested 8 GPUs, but cmk-test-project quota is 0 GPUs, while 0 GPUs are already allocated for non-preemptible pods. Use a preemptible workload to go over quota.
- After successful creation of inference workload, we’ll see it in Running status on the dashboard.
- Run:ai automatically converts inference workloads into a Knative Service (ksvc). Knative handles the underlying scaling, routing, and external HTTP endpoints, providing you with a fully managed, serverless inference service.
- Verify the creation of the workload & knative service and test your external endpoint via cURL.
$ kubectl get inferenceworkload -A
NAMESPACE    NAME  	  STATUS     AGE     URL	    LATEST CREATED	    LATEST       READY
runai-cmk-test-project   cmk-inference-workload-2   Ready    31h   http://cmk-inference-workload-2.runai-cmk-test-project.216.84.151.16.sslip.io   cmk-inference-workload-2-00001   cmk-inference-workload-2-00001
$ kubectl get po -n runai-cmk-test-project
NAME READY STATUS RESTARTS AGE
cmk-inference-workload-<> 2/2 Running 0 4m59s
$ kubectl get ksvc -n runai-cmk-test-project
NAME		URL  		LATESTCREATED		LATESTREADY		READY		REASON
cmk-inference-workload-2   http://cmk-inference-workload-2.runai-cmk-test-project.216.84.151.16.sslip.io   cmk-inference-workload-2-00001   cmk-inference-workload-2-00001   True
$ curl http://cmk-inference-workload-2.runai-cmk-test-project.216.84.151.16.sslip.io/v1/chat/completions -H "Content-Type: application/json" -d '{
"model": "meta-llama/Llama-3.2-1B-Instruct",
"messages": [
{
"role": "user",
"content": "Tell me about NVIDIA"
}
],
"max_tokens": 50,
"temperature": 0.7
}'
{"id":"chatcmpl-aa9f3d98-678b-4109-a777-95f6113d4099","object":"chat.completion","created":1761890277,"model":"meta-llama/Llama-3.2-1B-Instruct","choices":[{"index":0,"message":{"role":"assistant","content":"NVIDIA Corporation is an American technology company headquartered in Santa Clara, California. The company was founded in 1993 by Jensen Huang, Curtis Priem, and Chris Malachowsky. NVIDIA is best known for its graphics processing units (GPUs",...,"usage":{"prompt_tokens":39,"total_tokens":89,"completion_tokens":50,"prompt_tokens_details":null},"prompt_logprobs":null,"prompt_token_ids":null,"kv_transfer_params":null}
Accelerating the AI lifecycle
By successfully completing this deployment, you have combined Crusoe Managed Kubernetes (CMK) and NVIDIA Run:ai to create a state-of-the-art AI orchestration platform. You didn't just install software; you engineered a unified computing fabric that delivers the benefits of both platforms:
- Maximized efficiency: NVIDIA Run:ai turns the individual GPUs on CMK into a single, pooled virtual ocean of compute, allowing its intelligent scheduler to maximize utilization and reduce wasteful idle time.
- High-speed communication: The configuration, including the enablement of the hostdev-rdma-device CNI, ensures that your distributed training jobs can communicate across multiple nodes at the low latency speeds required for world-class performance.
- MLOps ready: The integration of Kubeflow, MPI, and Knative means your cluster is fully capable of handling every stage of the MLOps lifecycle, from distributed training to highly scalable, serverless inference.
This robust, certified, and cloud-agnostic deployment empowers your data science teams with self-service access to the reliable, high-performance infrastructure needed to accelerate models into production.
Ready to start managing your workloads with unprecedented control and efficiency? Learn more about CMK and sign up to explore Crusoe Cloud.